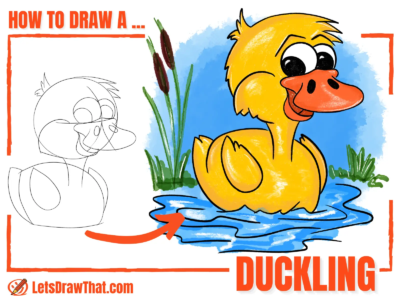
Learn how to draw a duckling floating on a pond. An easy step-by-step cute duckling drawing with large cartoon eyes and scruffy feather hairdoo.
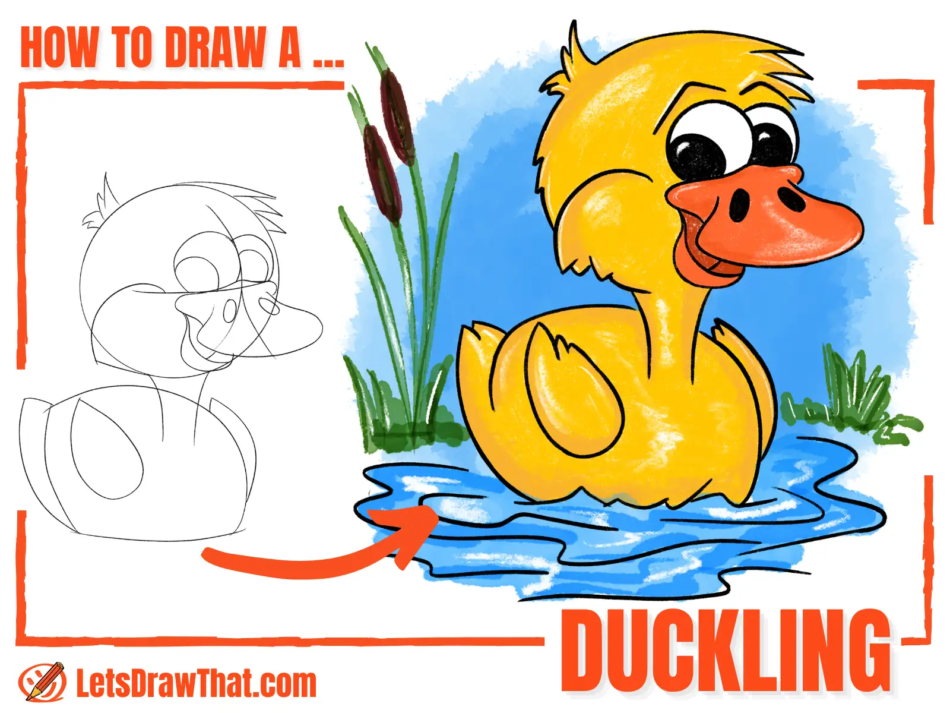
In today’s tutorial, you will learn how to draw a duckling step-by-step. We start the duckling drawing with the usual simple base shapes – a circle for a head and an egg-shaped body.
Then, we will dress up the sketch by adding some easy-to-draw details. The result is a really cute duckling drawing with large cartoony eyes, scruffy feathers, and a funny hairdo swimming in a little puddle of water.
Let’s get your pencils ready and learn how to draw a duckling!
This tutorial is part of our Easter drawings collection.
min
You will need: pencil, fineliner pen, colored pencils, eraser and drawing paper or sketchbook
Disclaimer: LetsDrawThat.com participates in the Amazon Associates Program. If you purchase a product using a link on our website, we earn a small commission, at no extra cost to you. This is one way how you can support this website.
How to draw a duckling: base sketch step by step
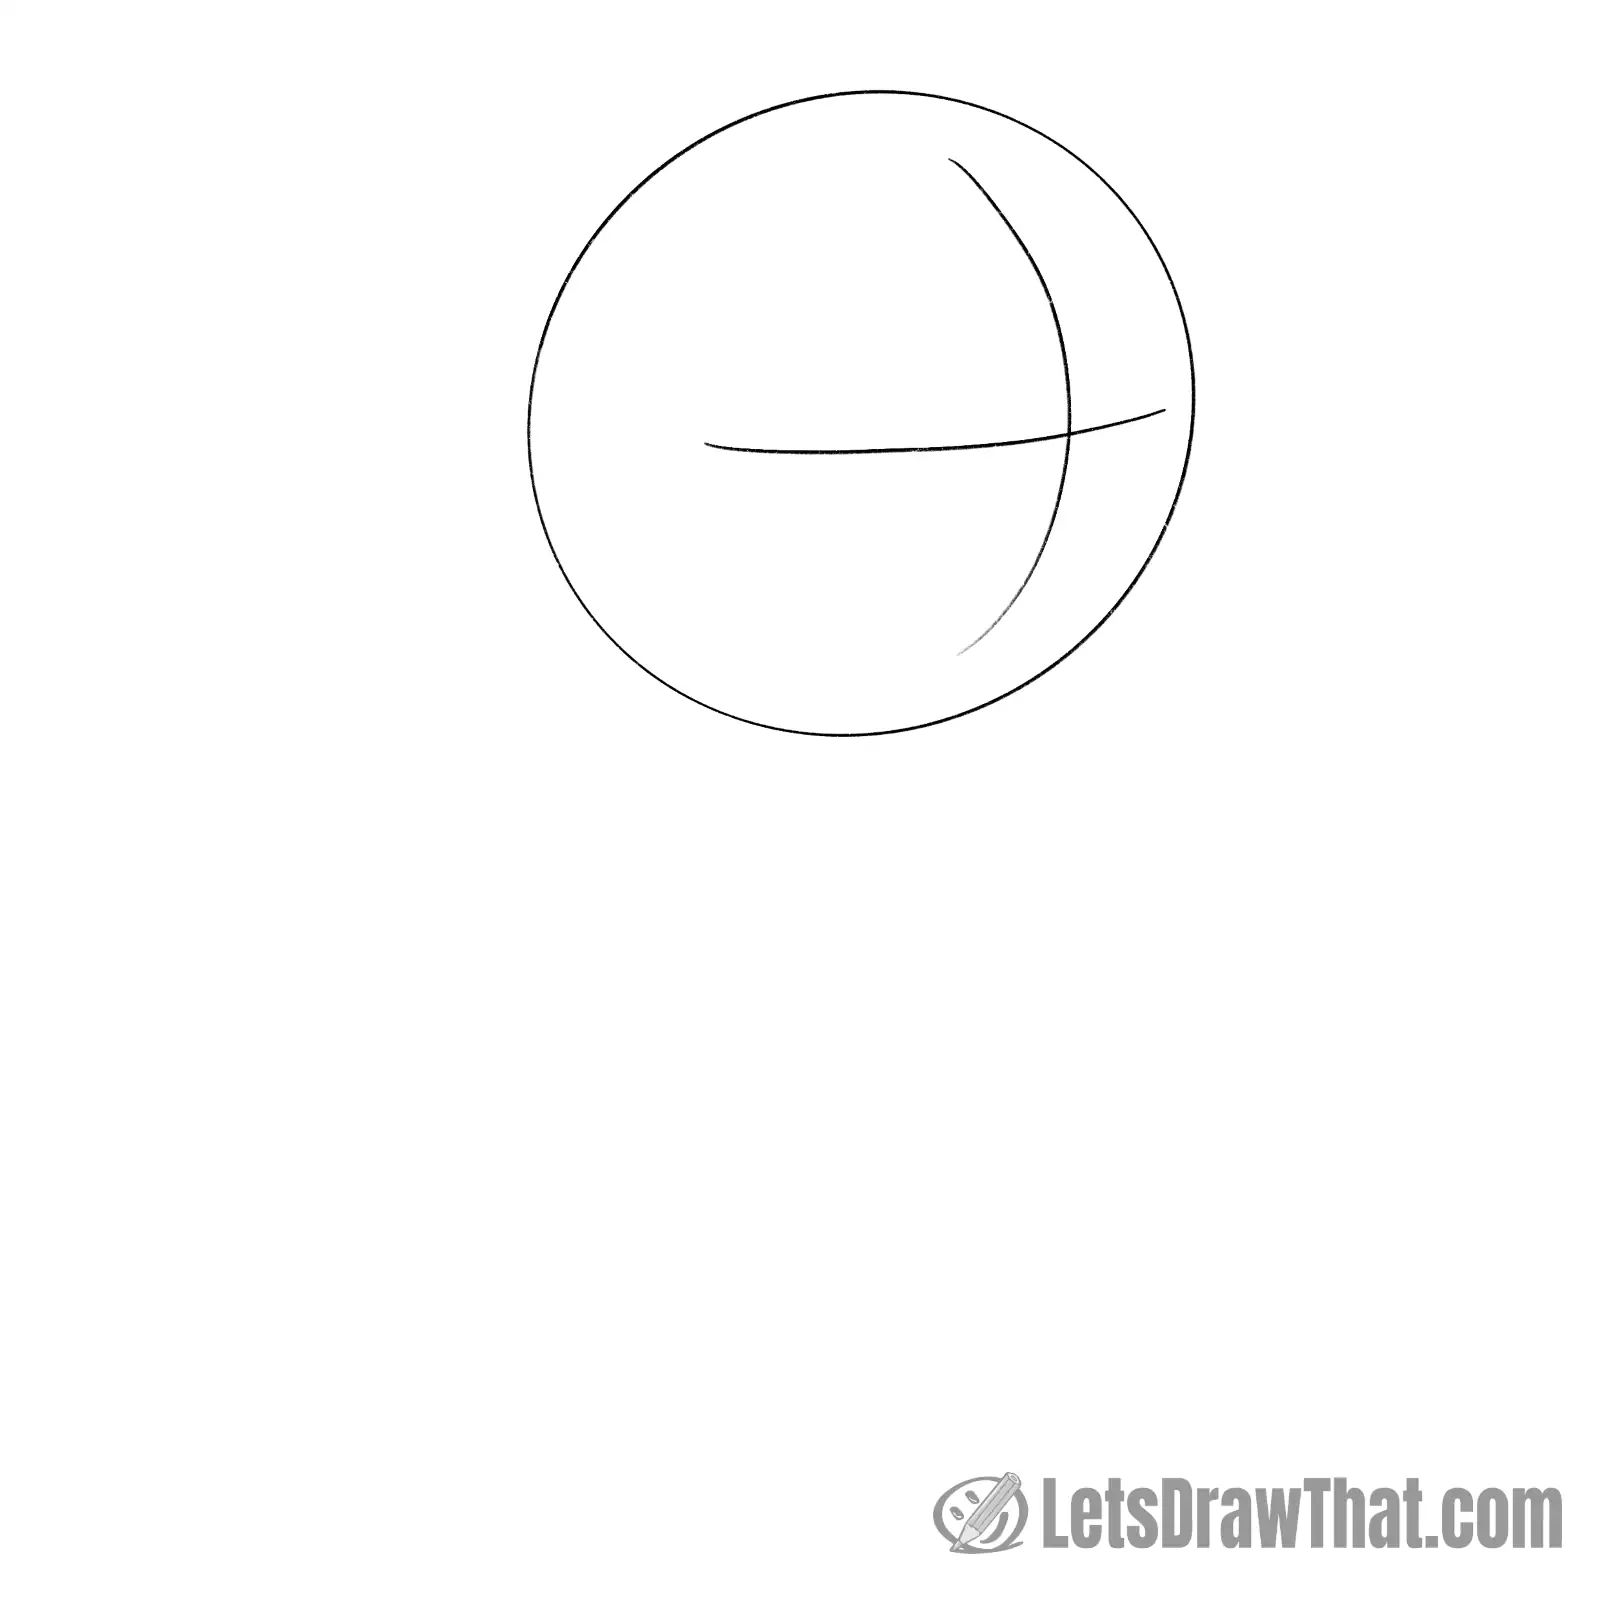
Step 1: Draw a circle for duckling's head
Let’s start our duckling drawing by laying out the base body shapes.
Draw a circle for the head. Next, add the face cross – this will help us place the duckling’s face soon.
The top-down curve shows which direction the duckling is looking – this one looks to the right. The left-to-right curve is how up or down the face is facing – this one is pretty much level.
Step 2: Draw the duckling's base body shape
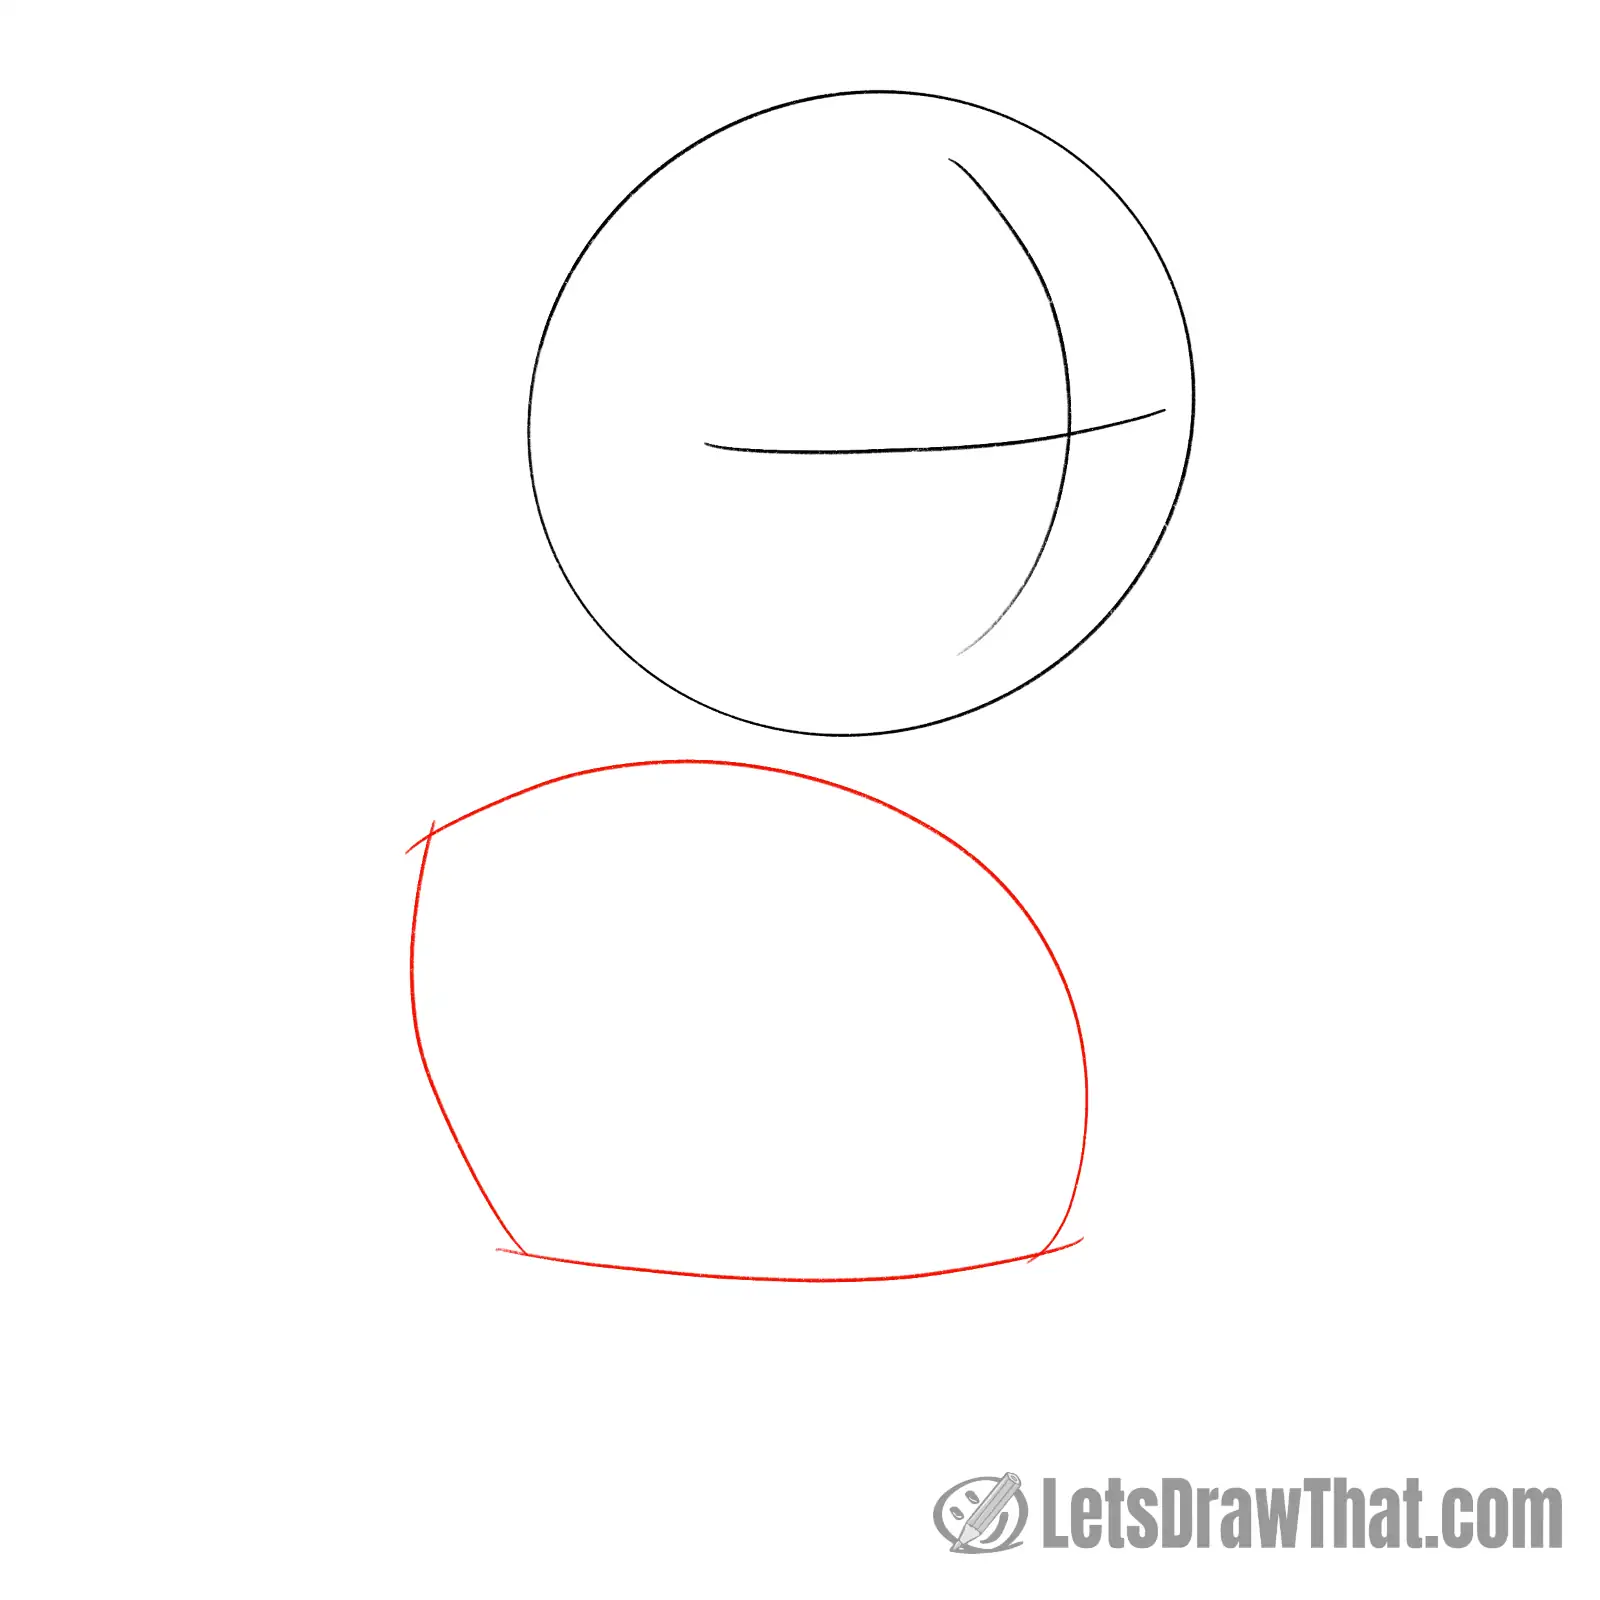
Next, draw the duckling’s body. We are aiming for a cartoony look with a large head, so the body’s overall size is about the same as the head.
It is made of a sort of back-leaning rectangle crossed with a half-egg shape. The bottom is almost flat, while the left side is curved out more. The top and right sides blend into a smooth single curve.
Step 3: Draw the duckling's beak
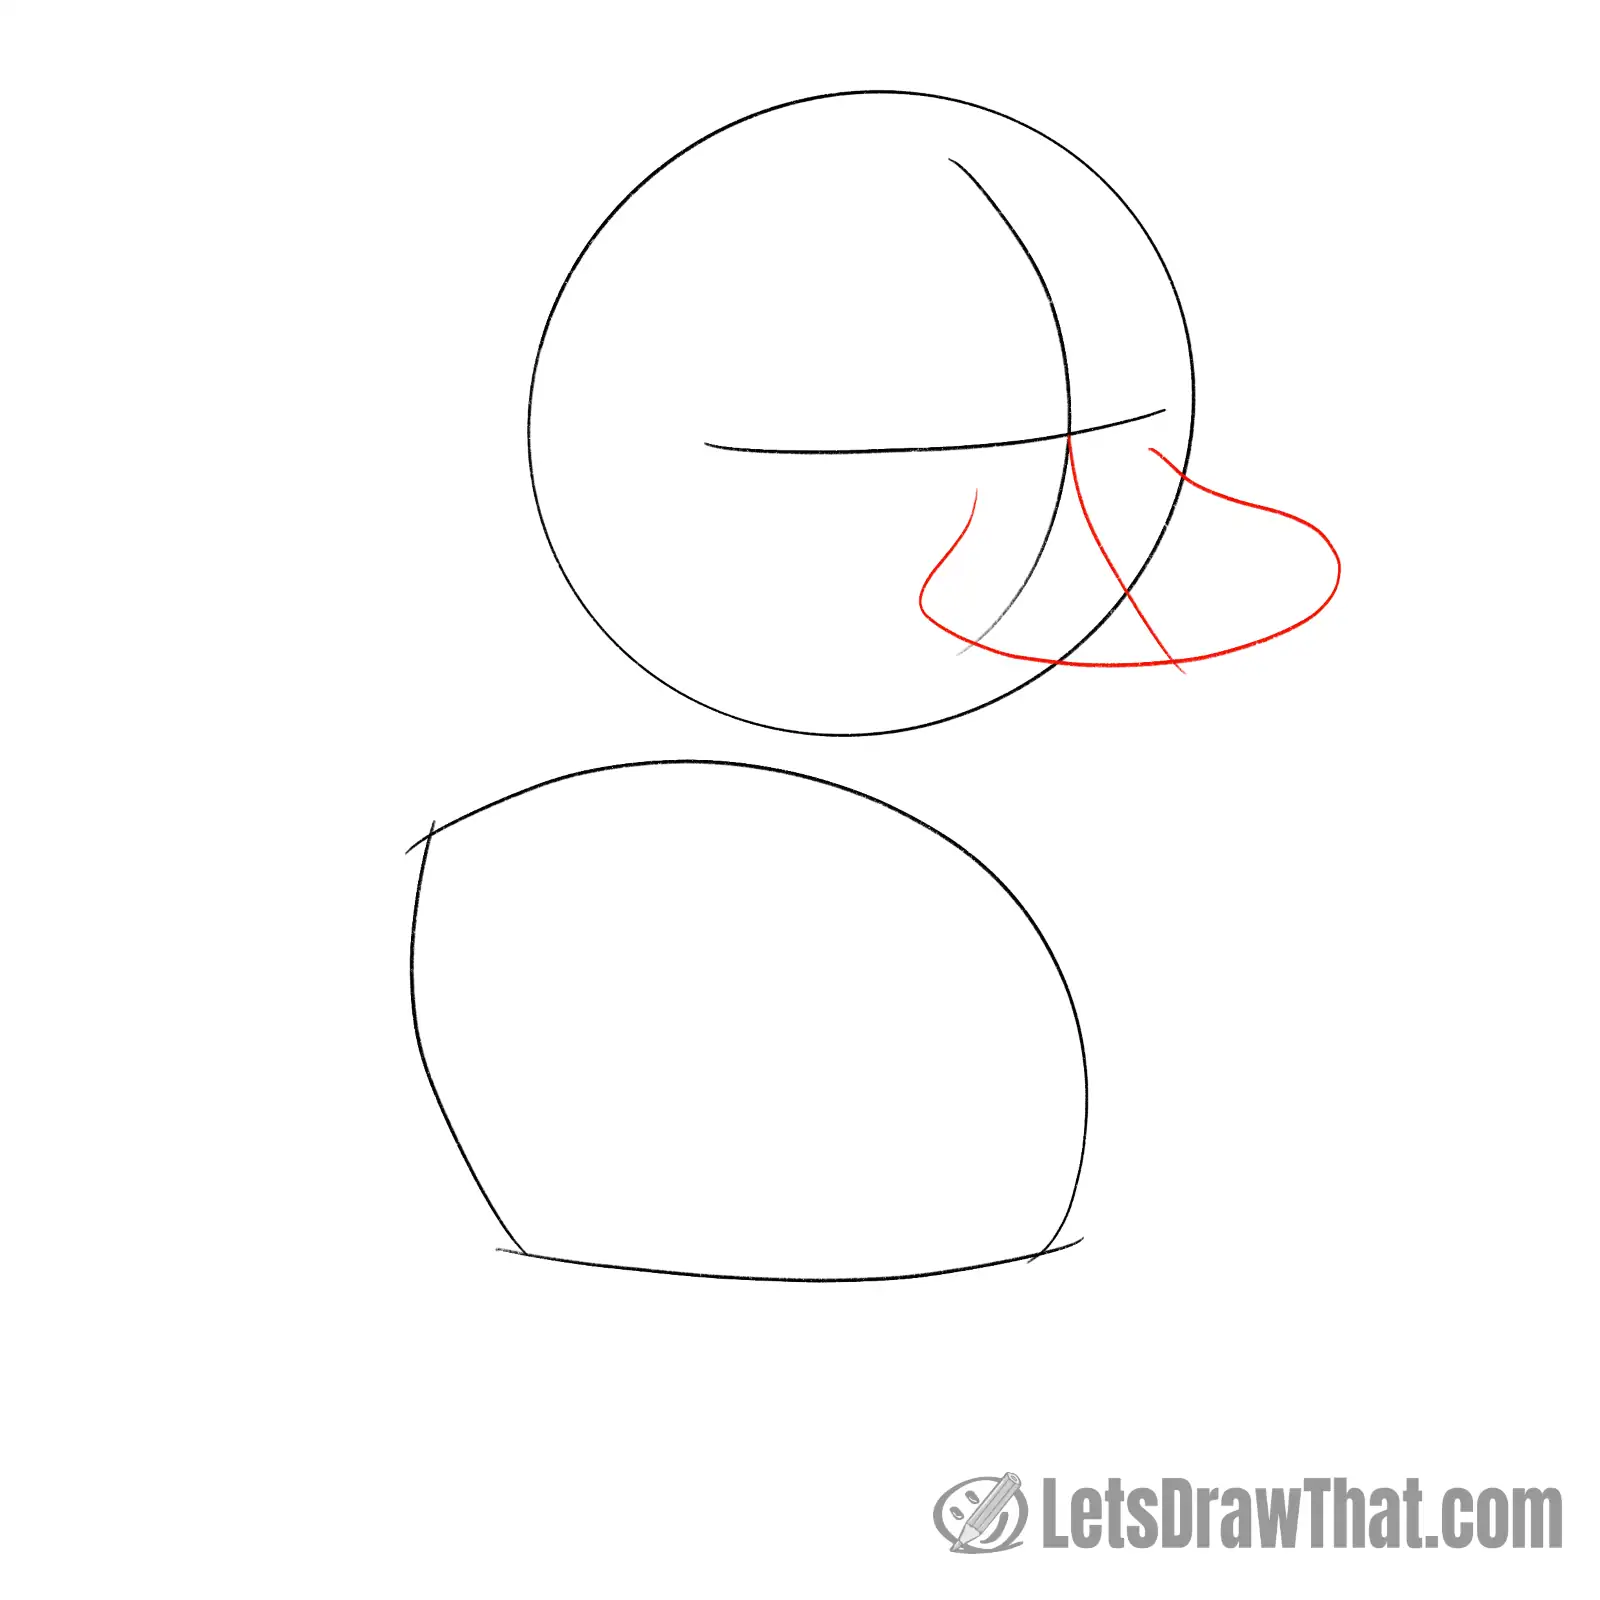
Sketch the duckling’s beak shape next.
We start by adding another guideline – a centreline for the beak. It starts from the center of the face cross and curves out and down.
Then, draw an oval shape centered around the beak line. Open it up at the top, curving back to connect to the face line.
Step 4: Draw the top of the beak

Then draw the top of the duckling’s beak.
It is another fancy curve that follows the flat face-cross line with a small bump at the centerline.
It then curves down in rounded corners to meet with the beak we have drawn.
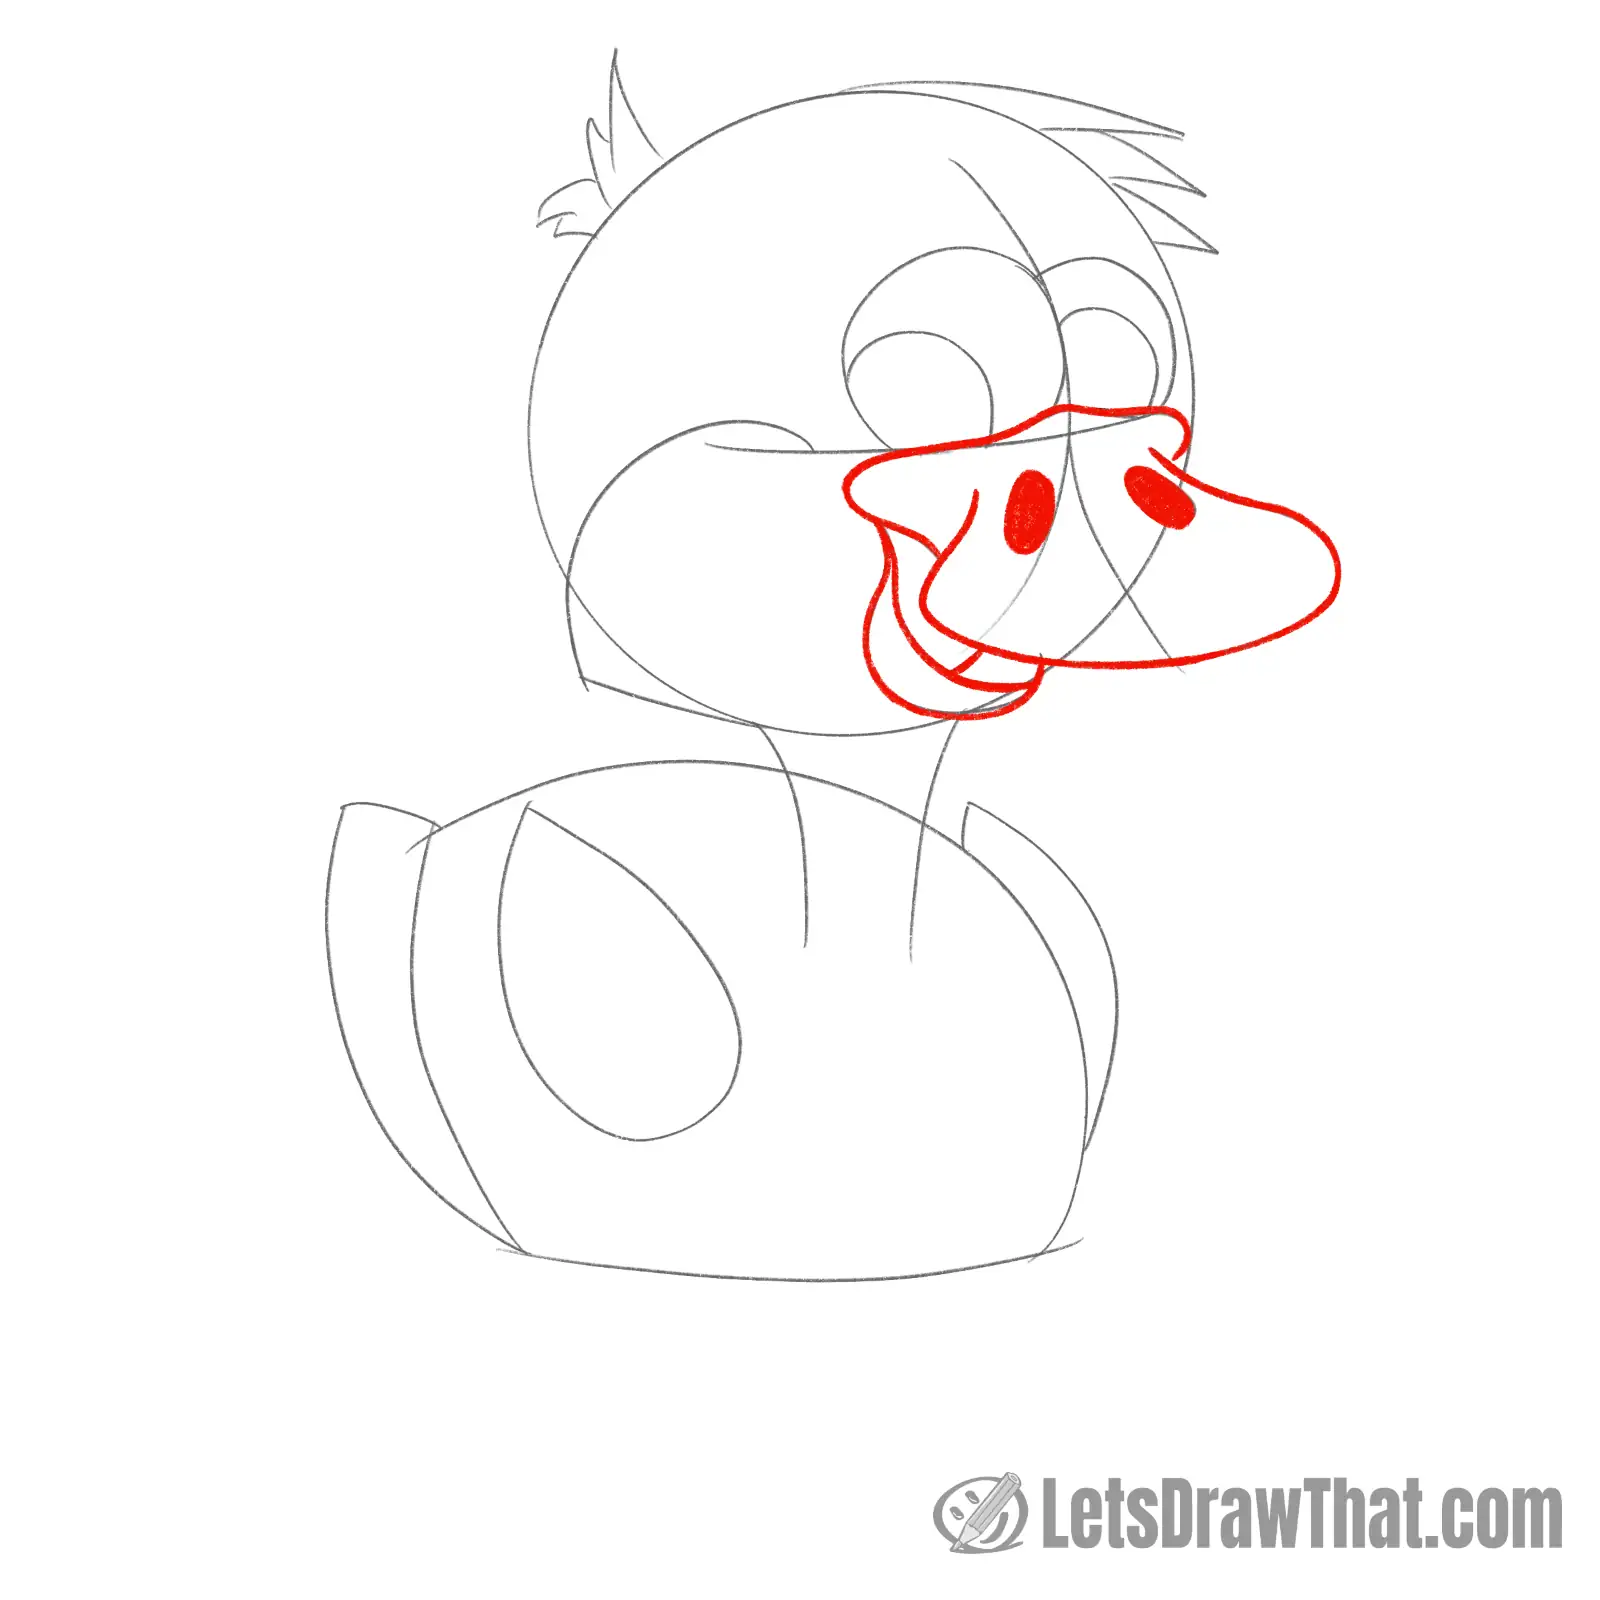
Step 5: Draw the duckling's "mouth" and nostrils
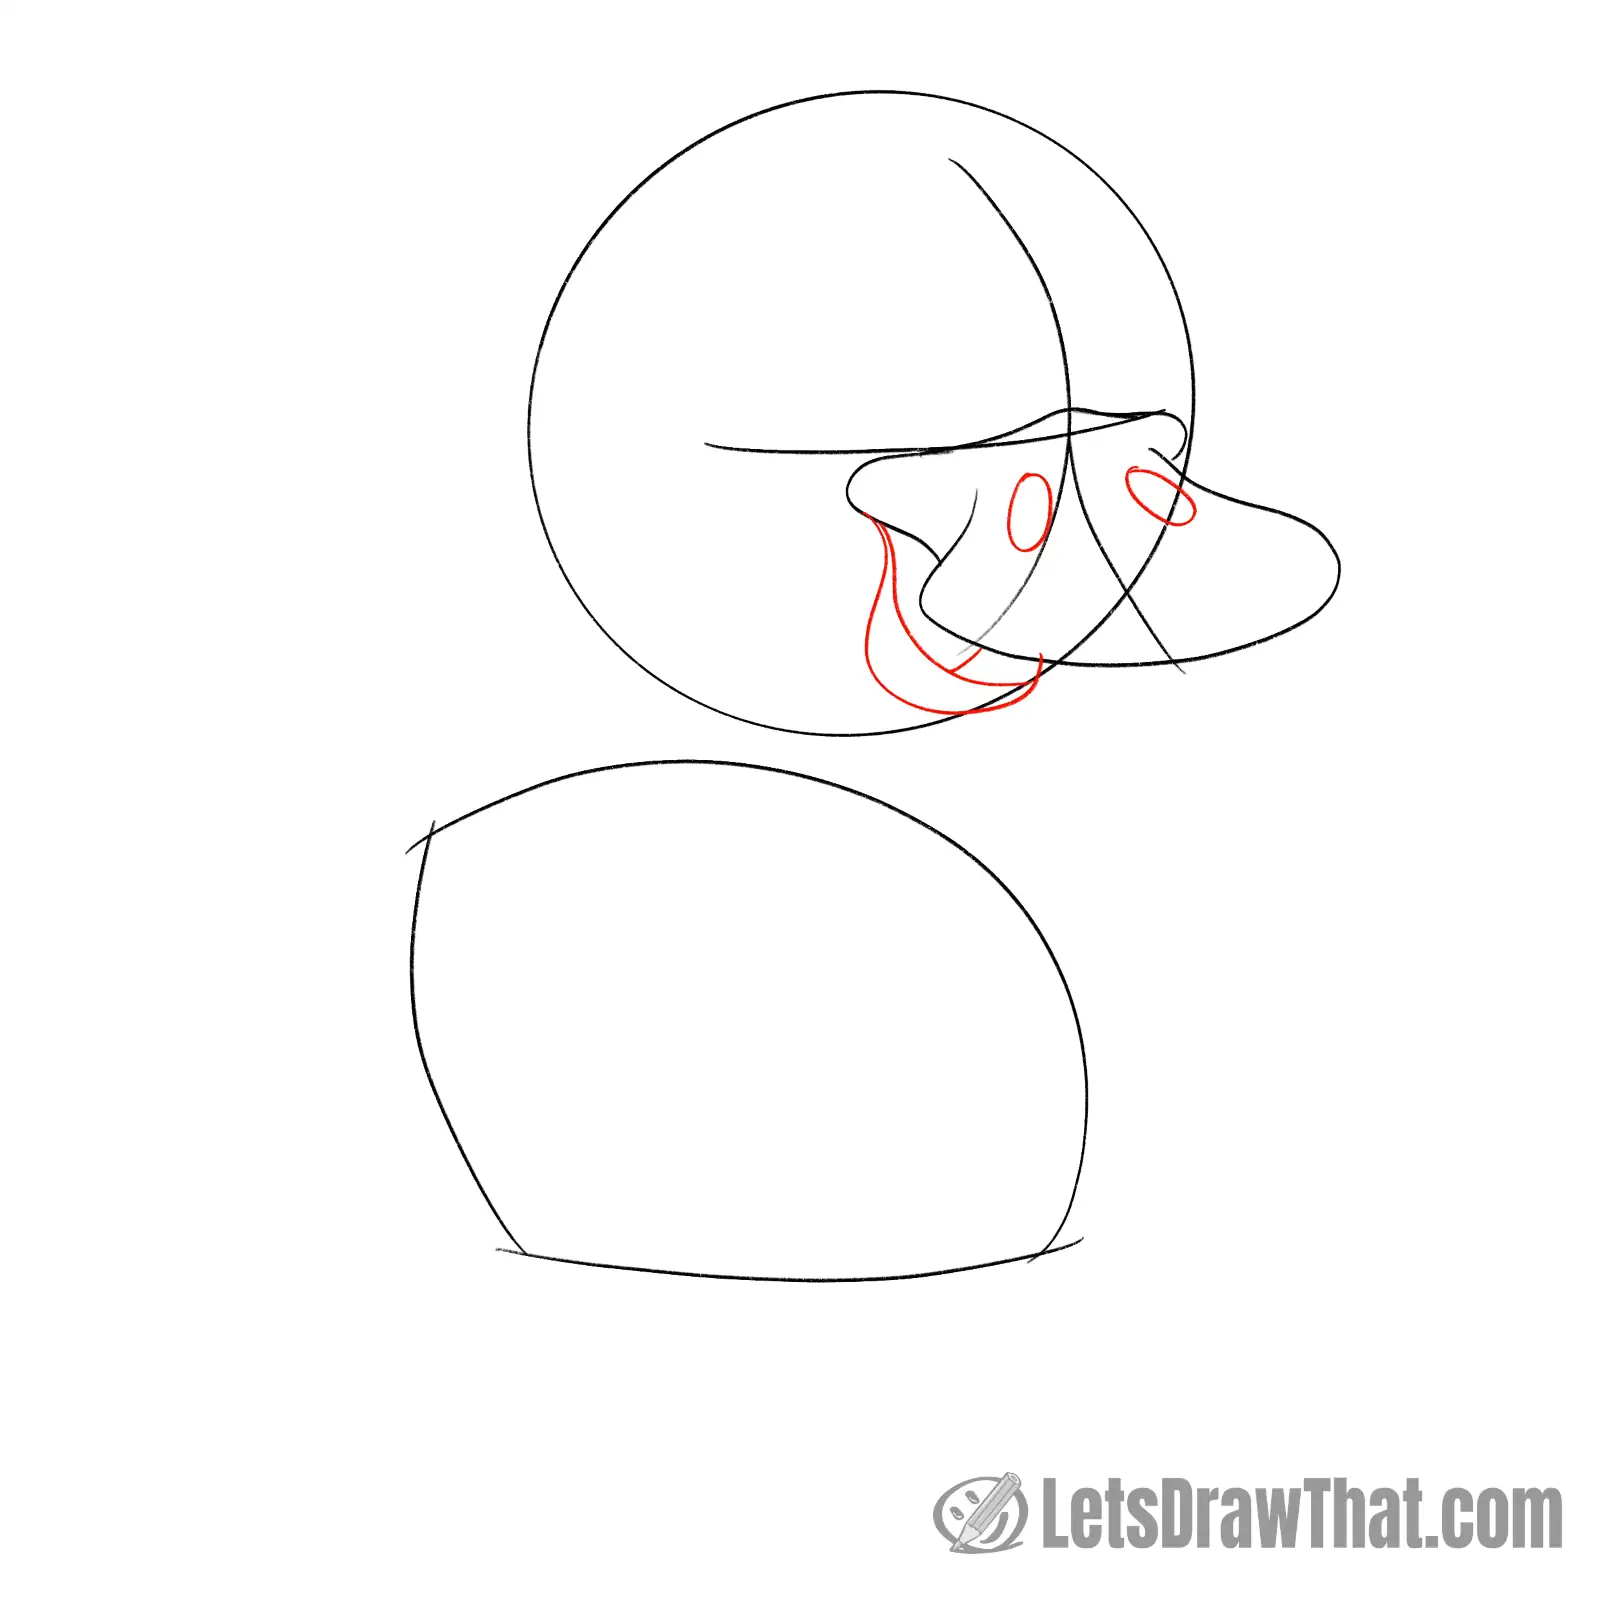
Next, we draw the duckling’s mouth or the lower “jaw” of the beak.
Start with the bottom curve – that one is a “U” shape from the left corner of the beak top to roughly where the beak crosses the head outline.
Then, add the two inner lines. The longer one follows the “jaw” shape and will be the outer “lip” line. The last short line inside the mouth is for the “lip” from the inside of the mouth.
Finally, add two ovals to the top of the beak for the nostrils.
Step 6: Draw the duckilng's eyes and cheek

It is time to give our duckling some eyes.
These are circles sitting on the top of the face line. The left eye is a touch larger, almost full circle, touching on the vertical centreline. The right eye is just a three-quarter circle.
Then, add the inner “pupil” half-circles. Our duckling is looking left, but you can place them towards the center or the right side of the eyes as well.
Next, the cheek is a line starting on the face line next to the beak and curving down. Join the end with almost a flat line back to the head outline.
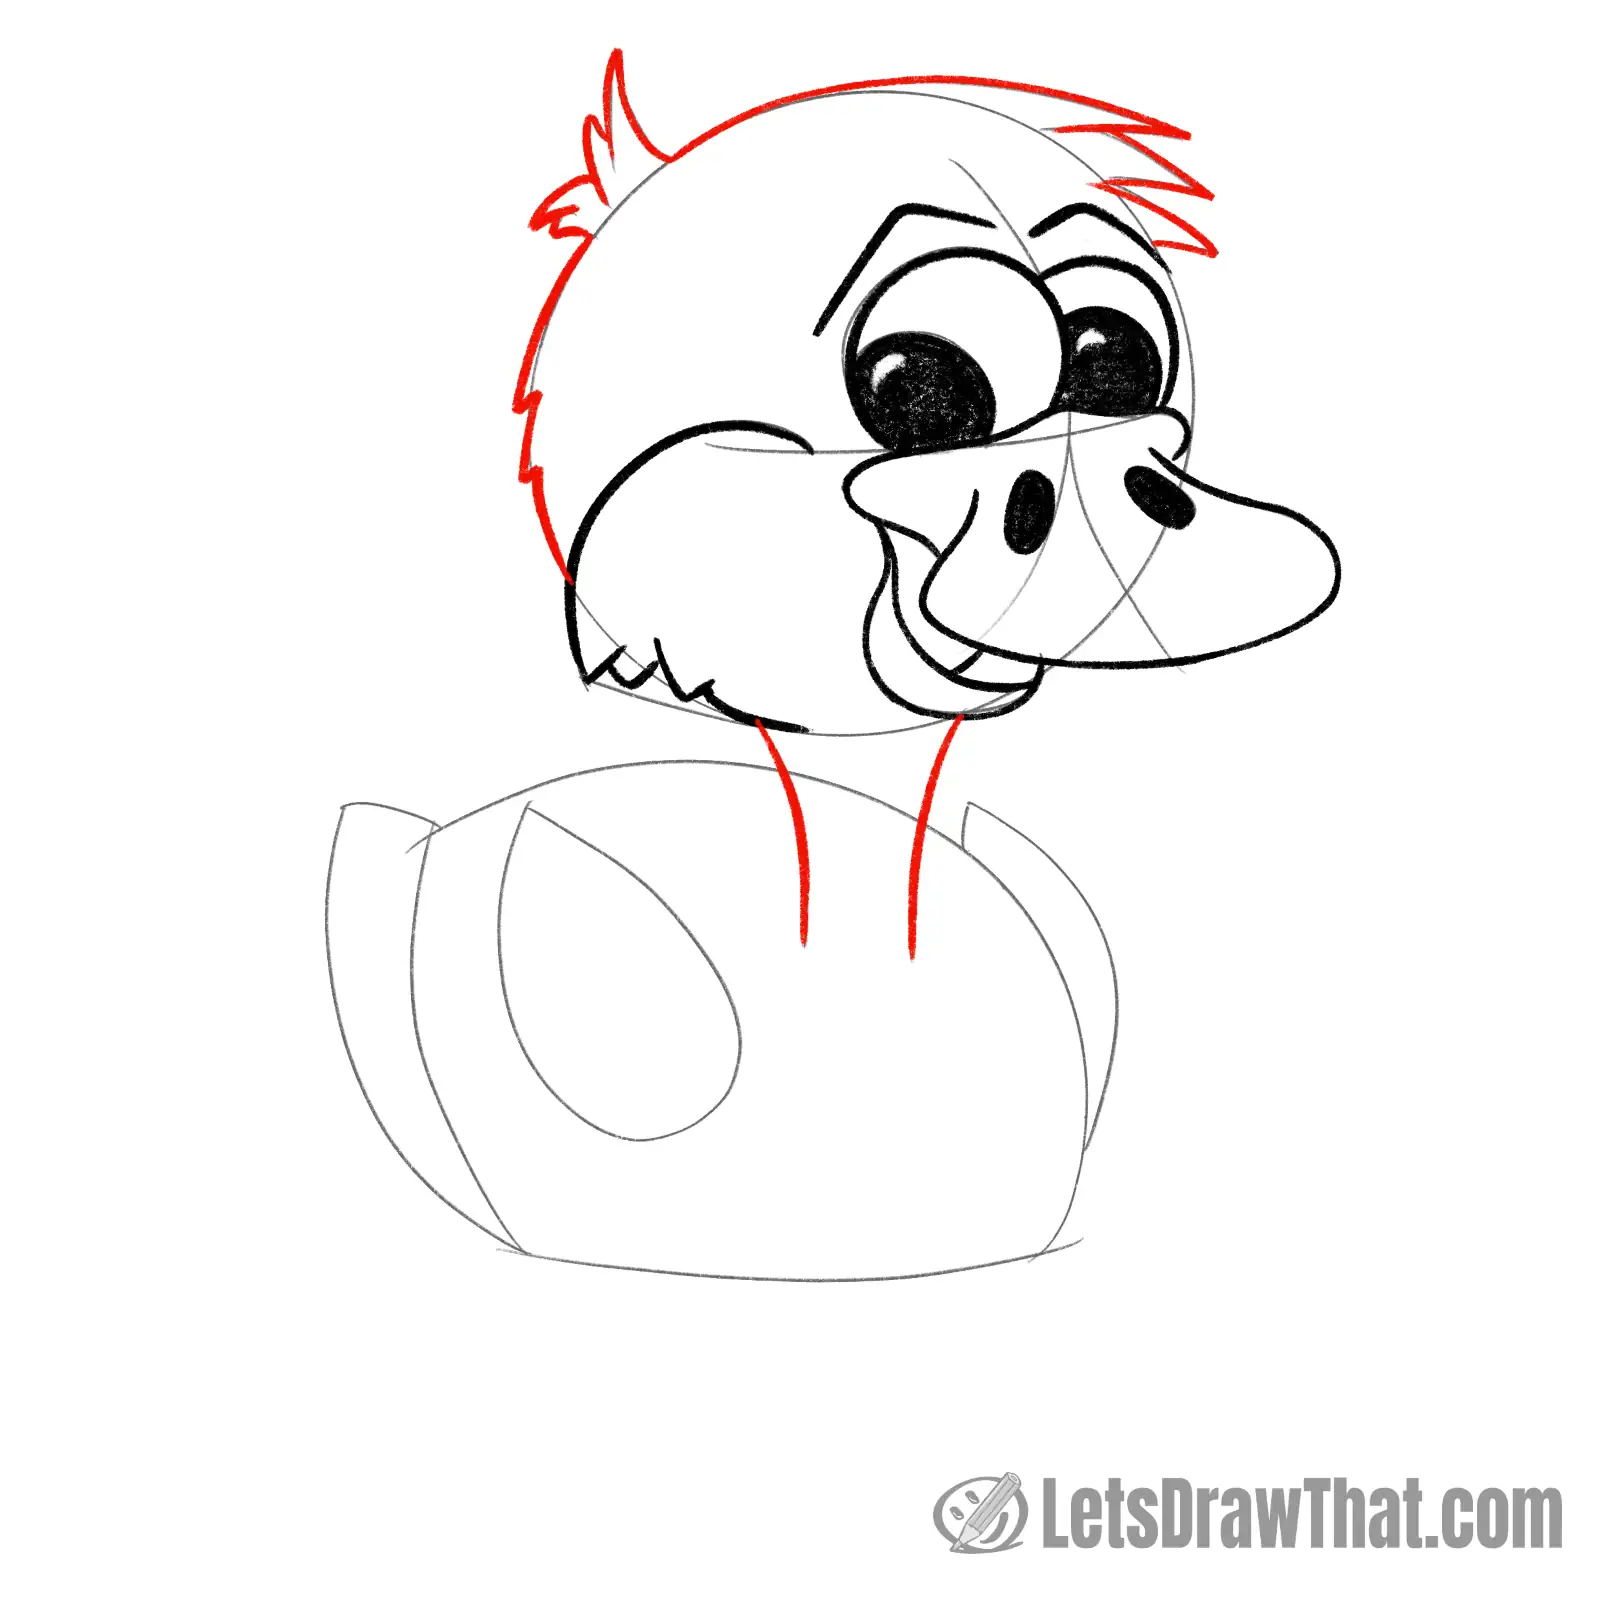
Step 7: Draw the hair" feathers and neck
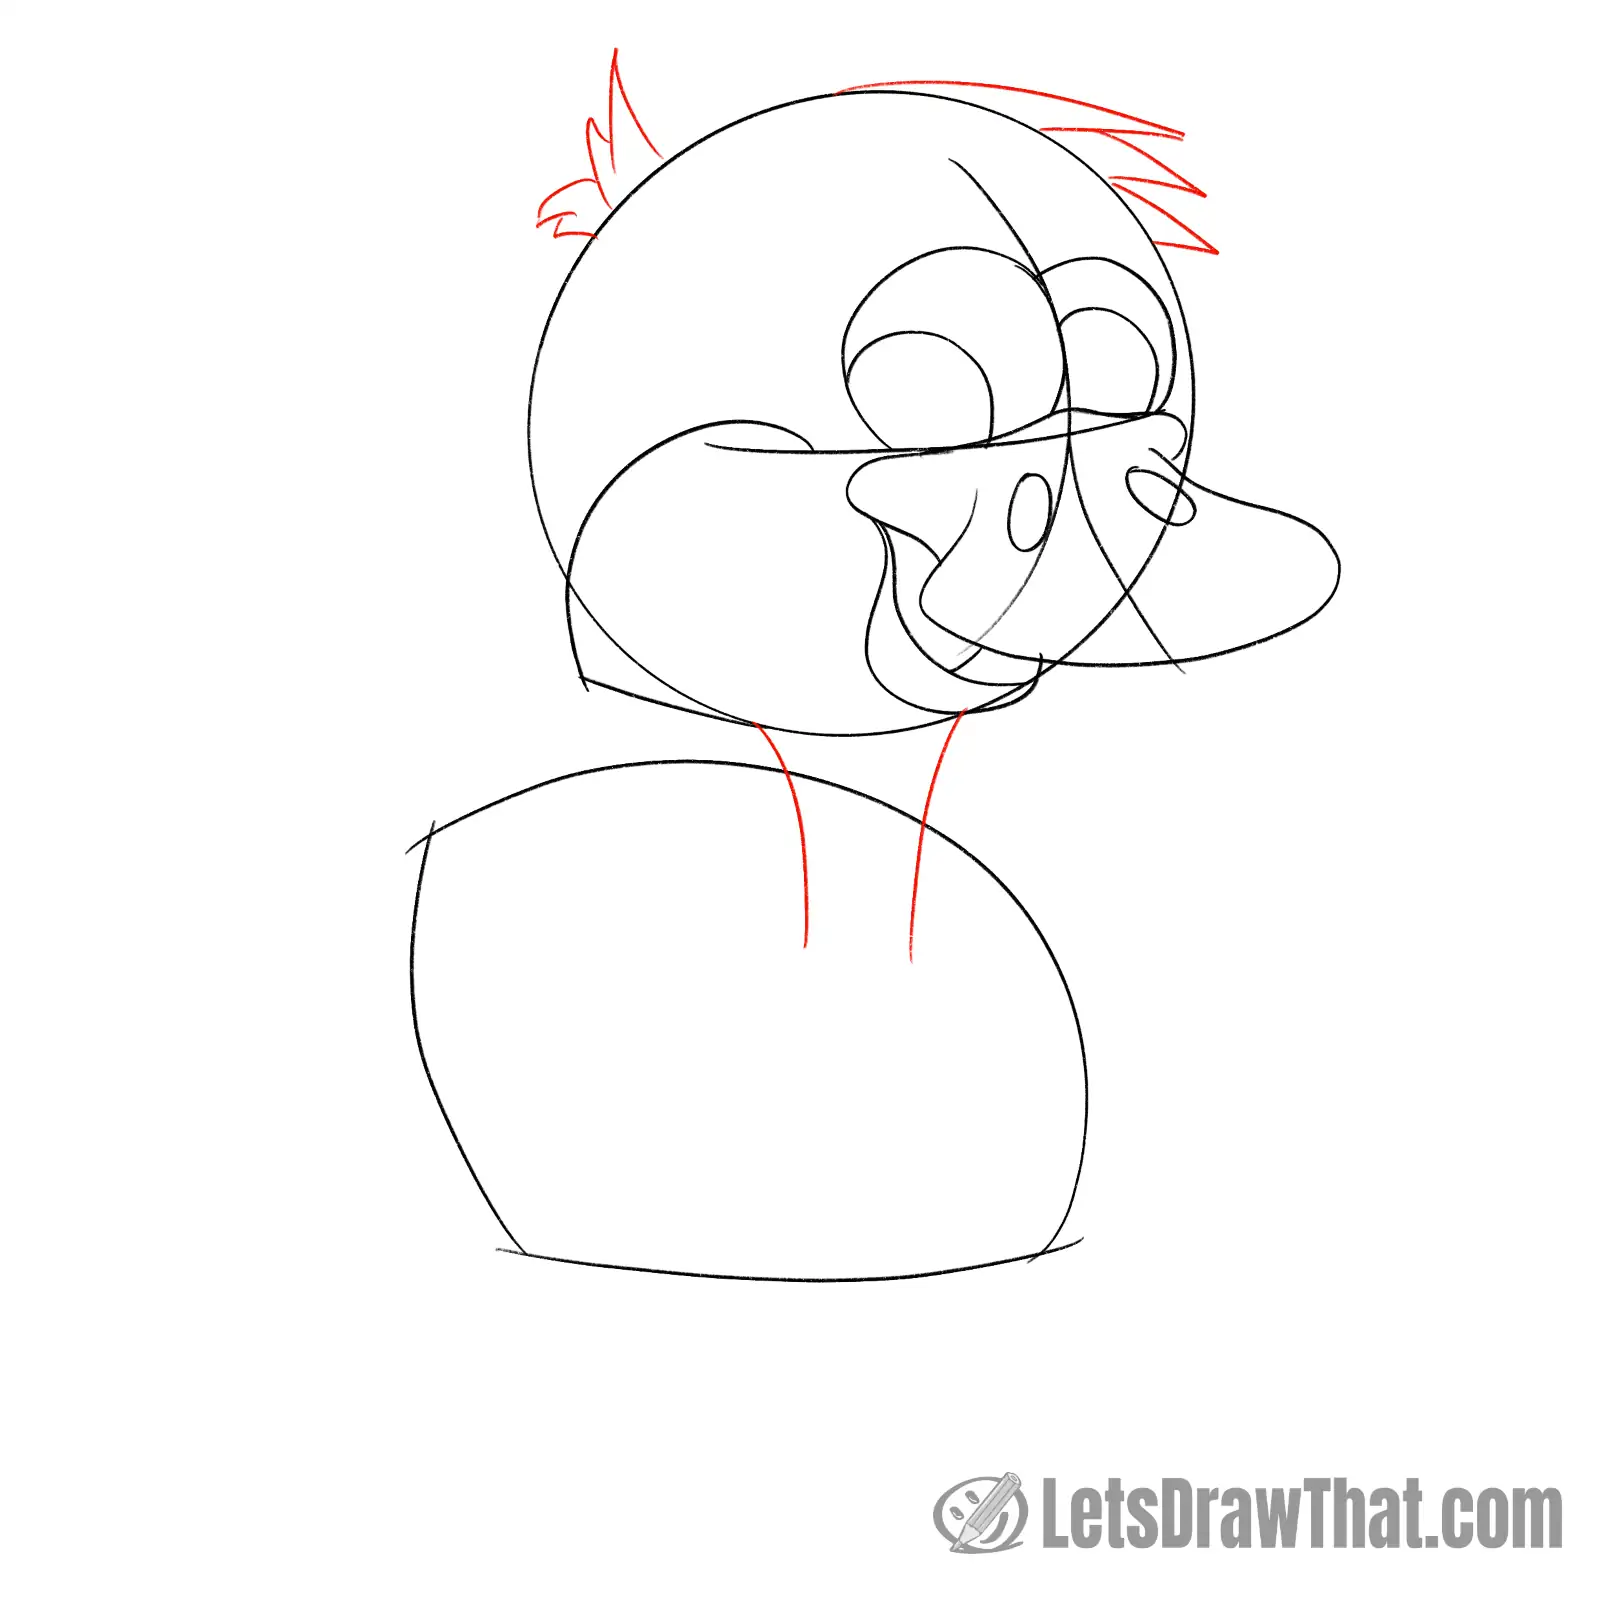
Let’s draw some “hair” feathers next. The front fringe is made of three “V” triangles curving slightly down. Then draw the back hairdo – two points up and two points down.
Also, let’s connect the head to the body with some neck next. Draw the neck just as two downlines from the head circle to the body chest – about two-thirds up the body.
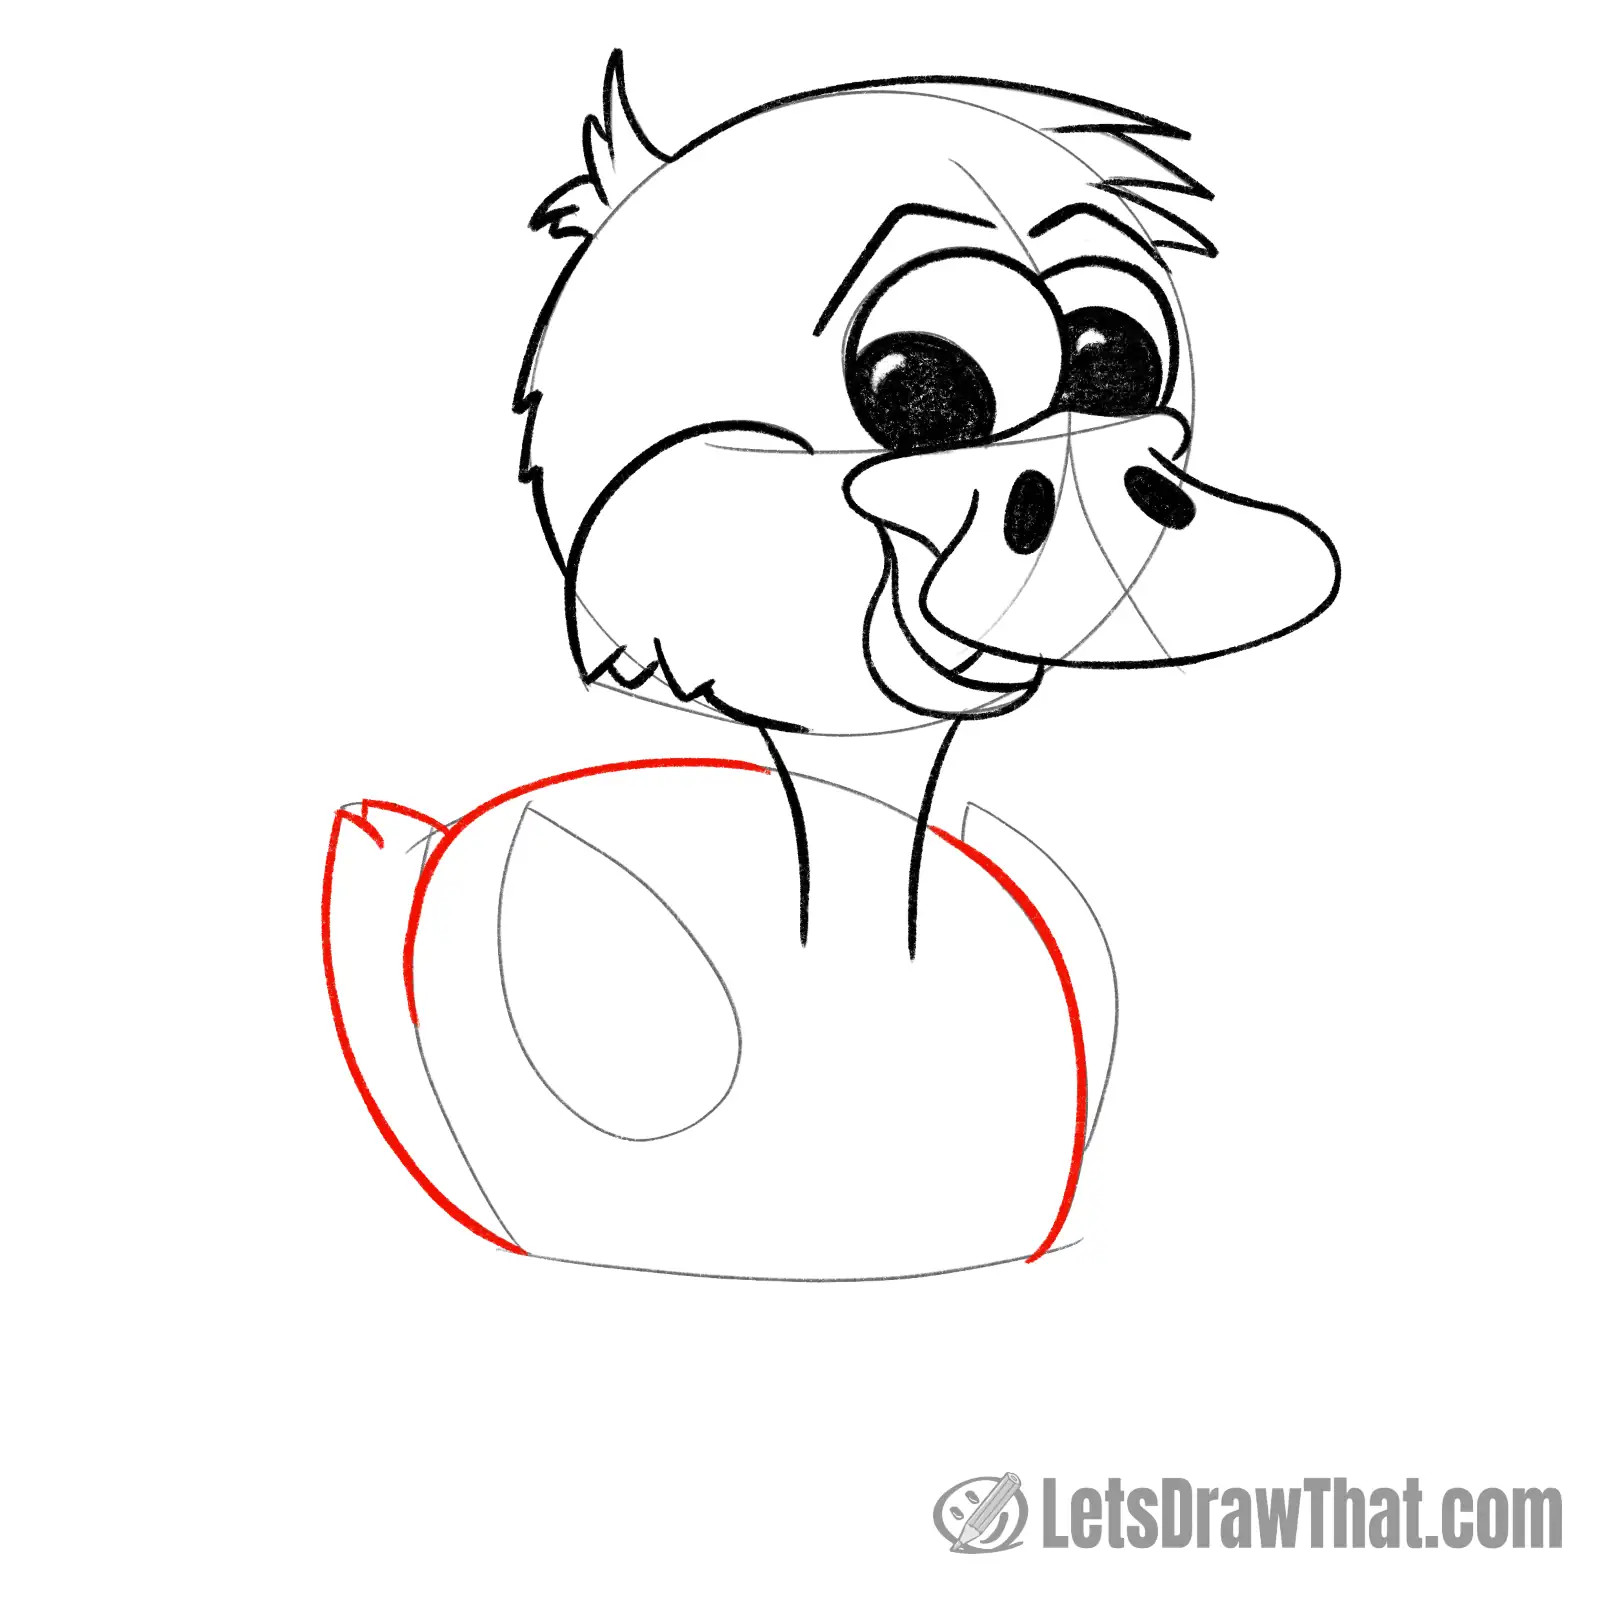
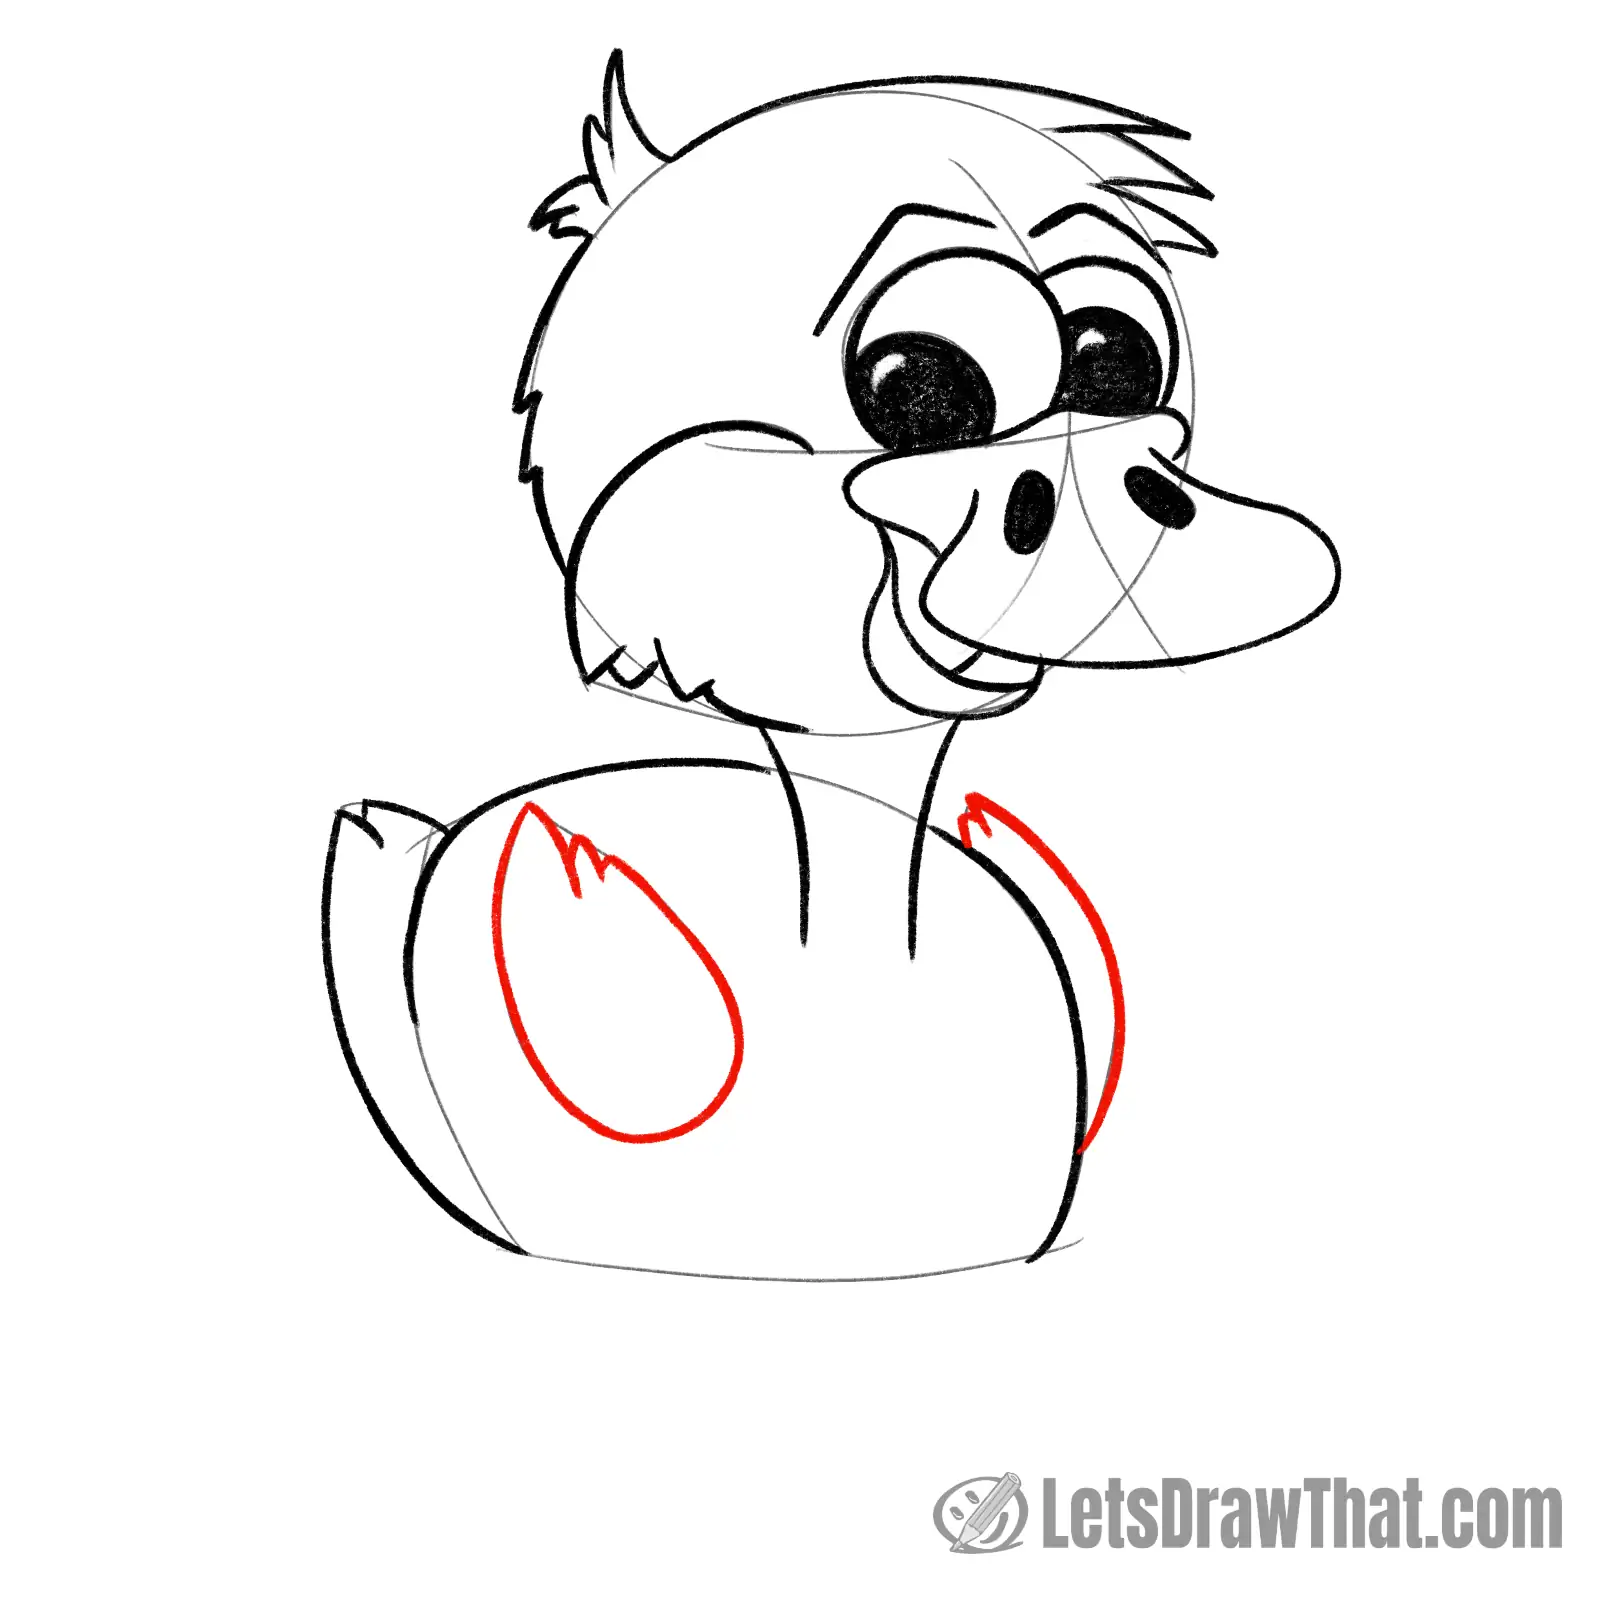
Step 8: Draw the duckling's wings and tail
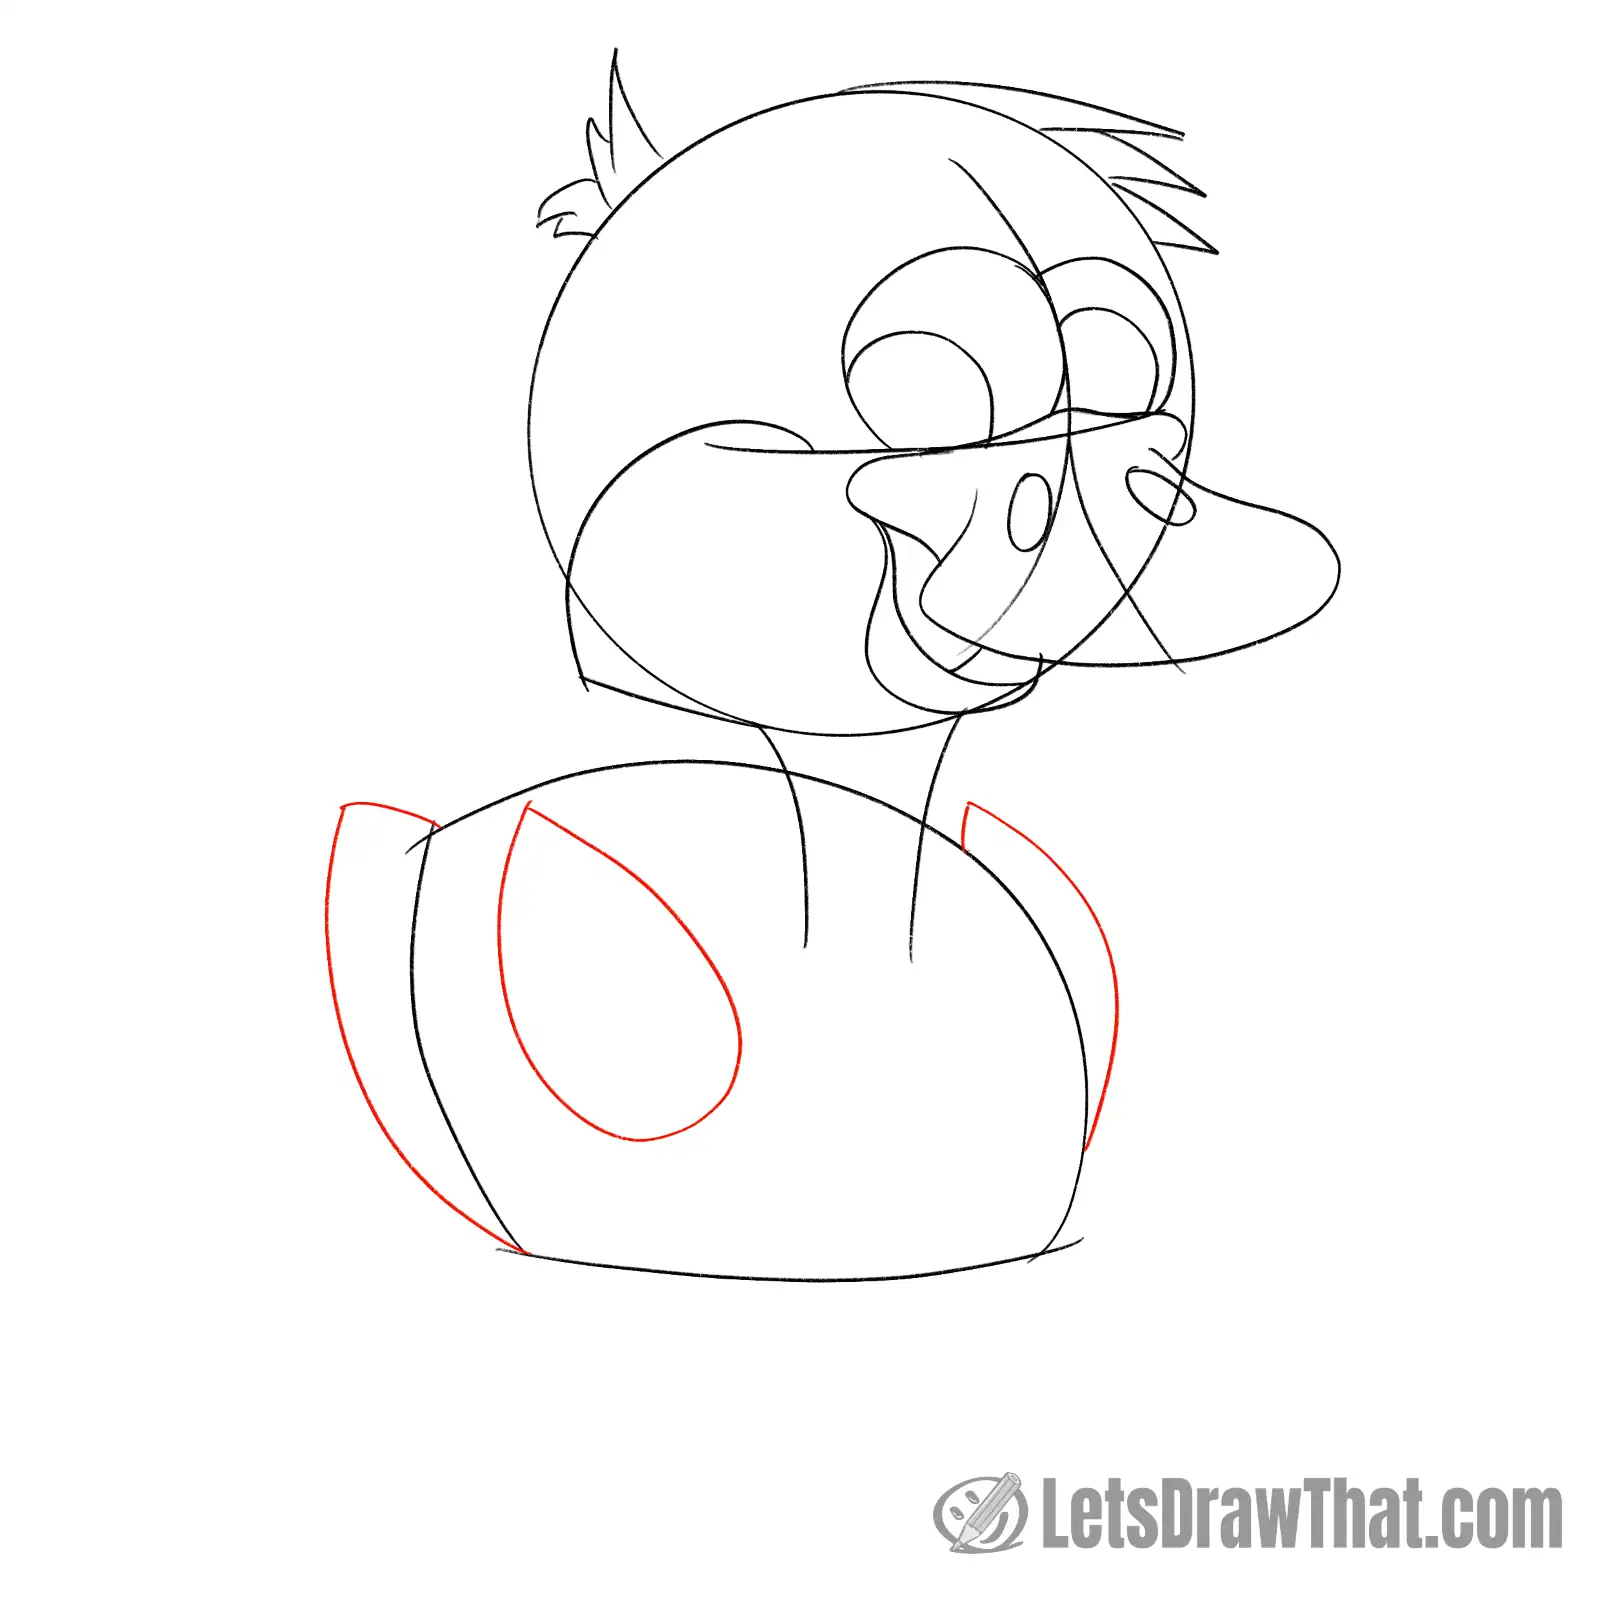
Now let’s give our duckling some wings and the tail.
Start with the front wing. It is a teardrop shape, slightly tilted to the left and placed about halfway between the neck and the back body line.
The other wing is the same shape but hiding behind the body. It ends up being just two lines poking out in front of the body.
Finally, the tail is again the same shape, just a touch larger. It is the same two lines hiding behind the back of the body, starting from the top-left body corner down to the body baseline.
How to draw a duckling: outline the drawing step by step
Step 1: Draw the duckling's beak
With the sketch done, it is time to outline and improve on our duckling drawing.
Start by outlining the beak and “mouth”. We have done the hard work, so these are just direct outline of the sketch.
Also, fill in the nostrils in black.
Step 2: Draw ducklings eyes and cheek

Next, draw the eyes. When coloring in the pupils, leave a little moon-shaped white at the top for the reflection in the eyes.
As the first improvement to sketch, add two eyebrows above the eyes – these are wide-open, upside-down “V” lines.
Next, outline the check. Follow the bottom line with some jagged lines made from little “V” shapes to suggest some ruffed-up cheek feathers.
Step 3: Draw the head and "hair" outline
Next up, draw the head and the “hair” feathers outline.
Again, we are mostly following the outer sketch lines. Leave a gap in the head outline where the hairdo is. Also, we have added a couple of zig-zags under the hairdo to give the back of the head some “hair” feathers.
With the head finished, draw the neck from the outline.
Step 4: Draw the duckling's body and tail
It is time to outline the duckling’s body.
Again, follow the sketch lines to outline the top of the body. Break the line for the neck and stop about halfway down the body at the back.
Then, outline the tail, adding two upside-down “V” feathers at the tip.
Leave out the bottom body line – we have a plan for that one later.
Step 5: Draw the duckling's wings
Complete the duckling drawing by outlining the wings.
Again, the small improvement is to add some feathers with zig-zag “V” lines at the tip of both wings.
That is pretty much it – that is how to draw a duckling.
Step 6: Draw apuddle of water for your duckling
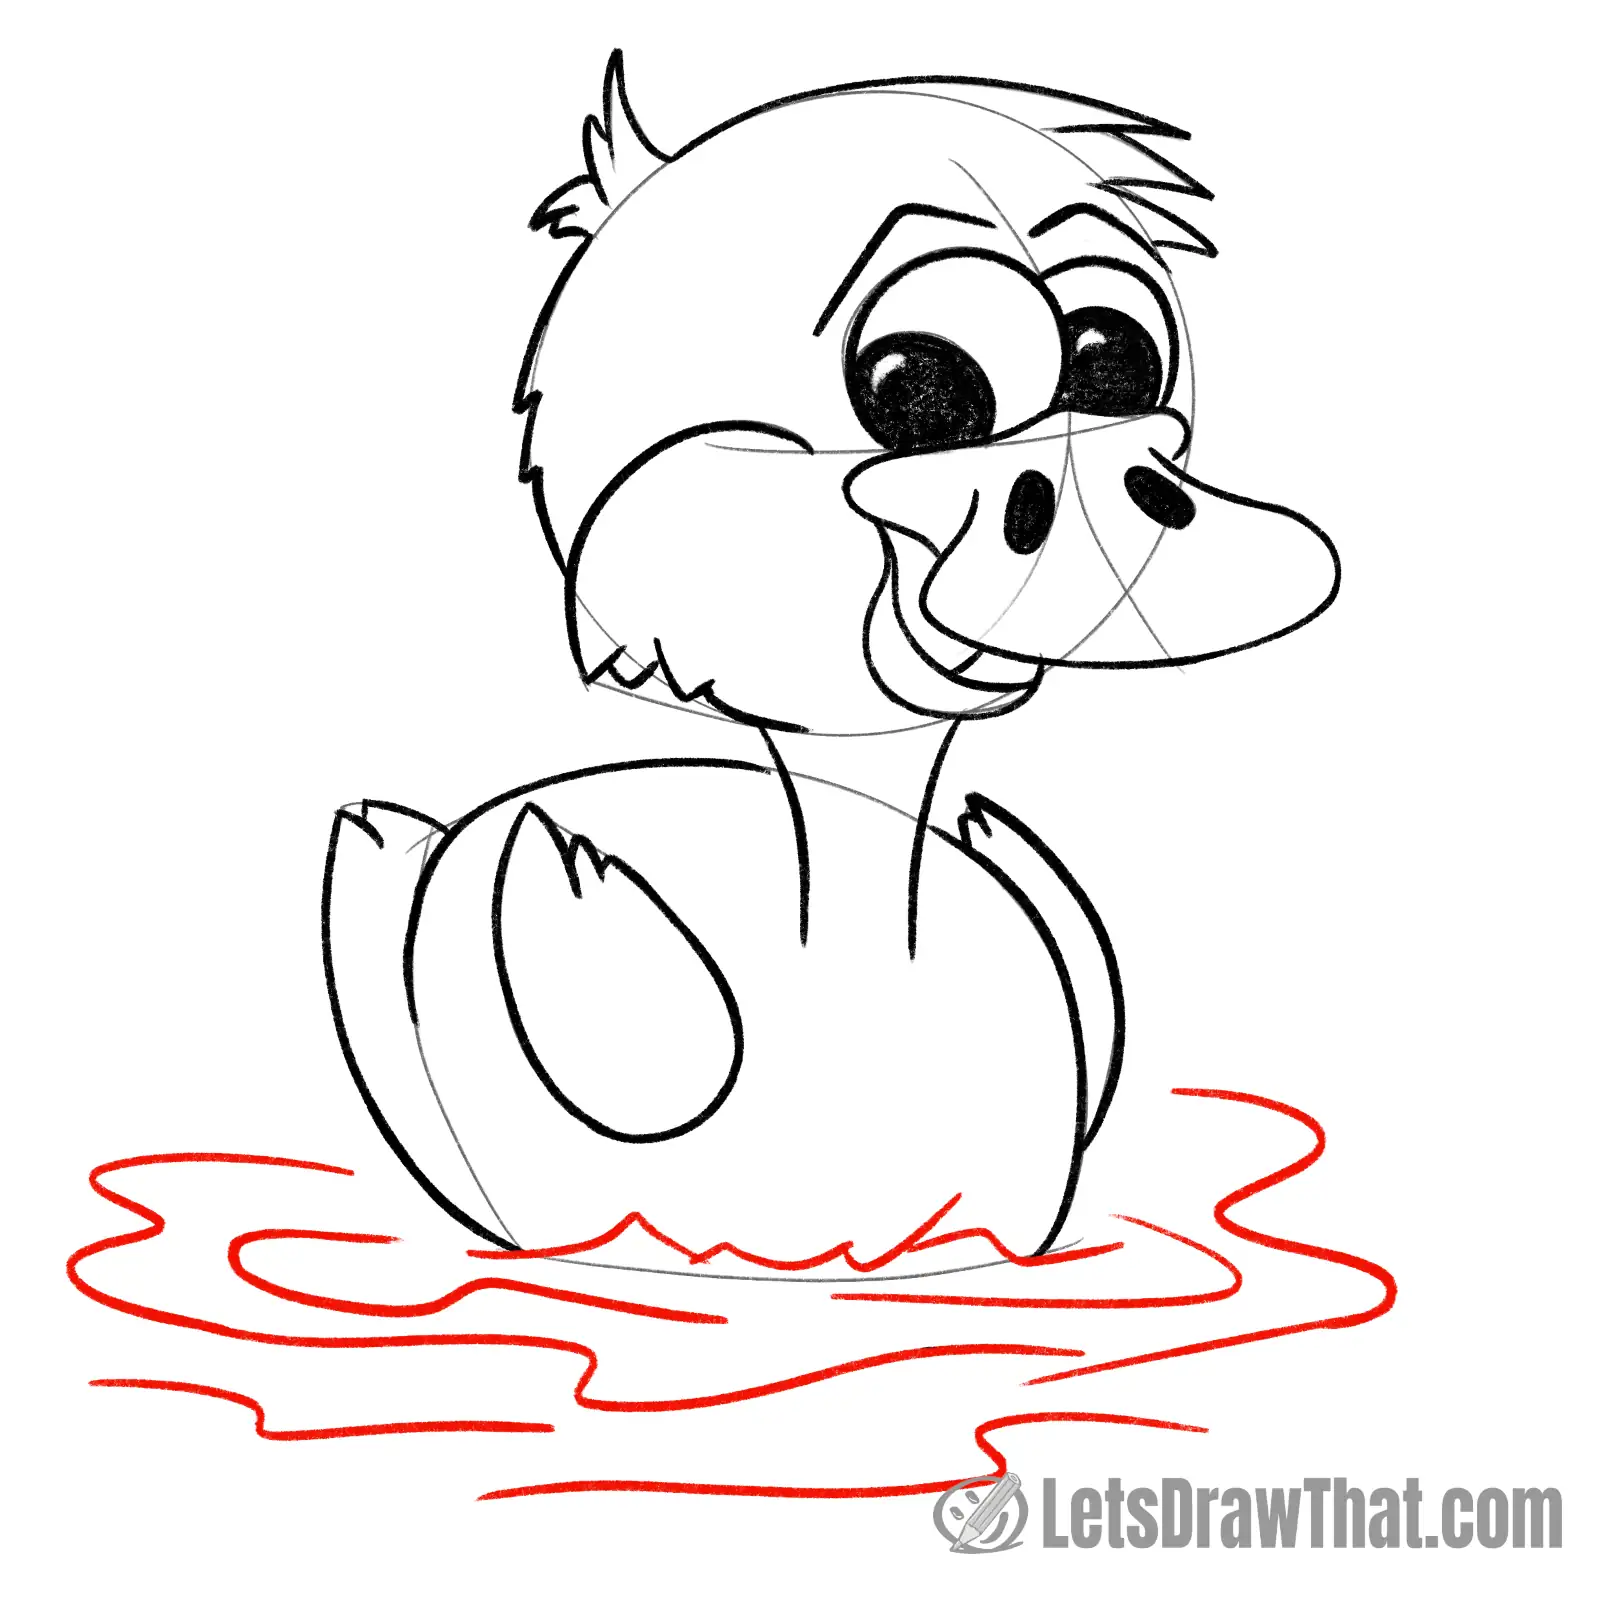
Now, here is the final improvement. Instead of our duckling floating in empty space, let’s draw it some puddle of water to splash in.
First, draw some zig-zags along the bottom body line (I told you we would fix it up).
Then add squiggly lines that go around the duckling in circles to suggest some more of the waves on the water.
Another cute baby chick to draw:
How to Draw a Chick – A Cute Cartoon Baby Chick Drawing
Learn how to draw a chick. An easy step by step instructions for a cute cartoon baby chick drawing made from two simple circles.How to draw a duckling: finished drawing
Duckling drawing outline
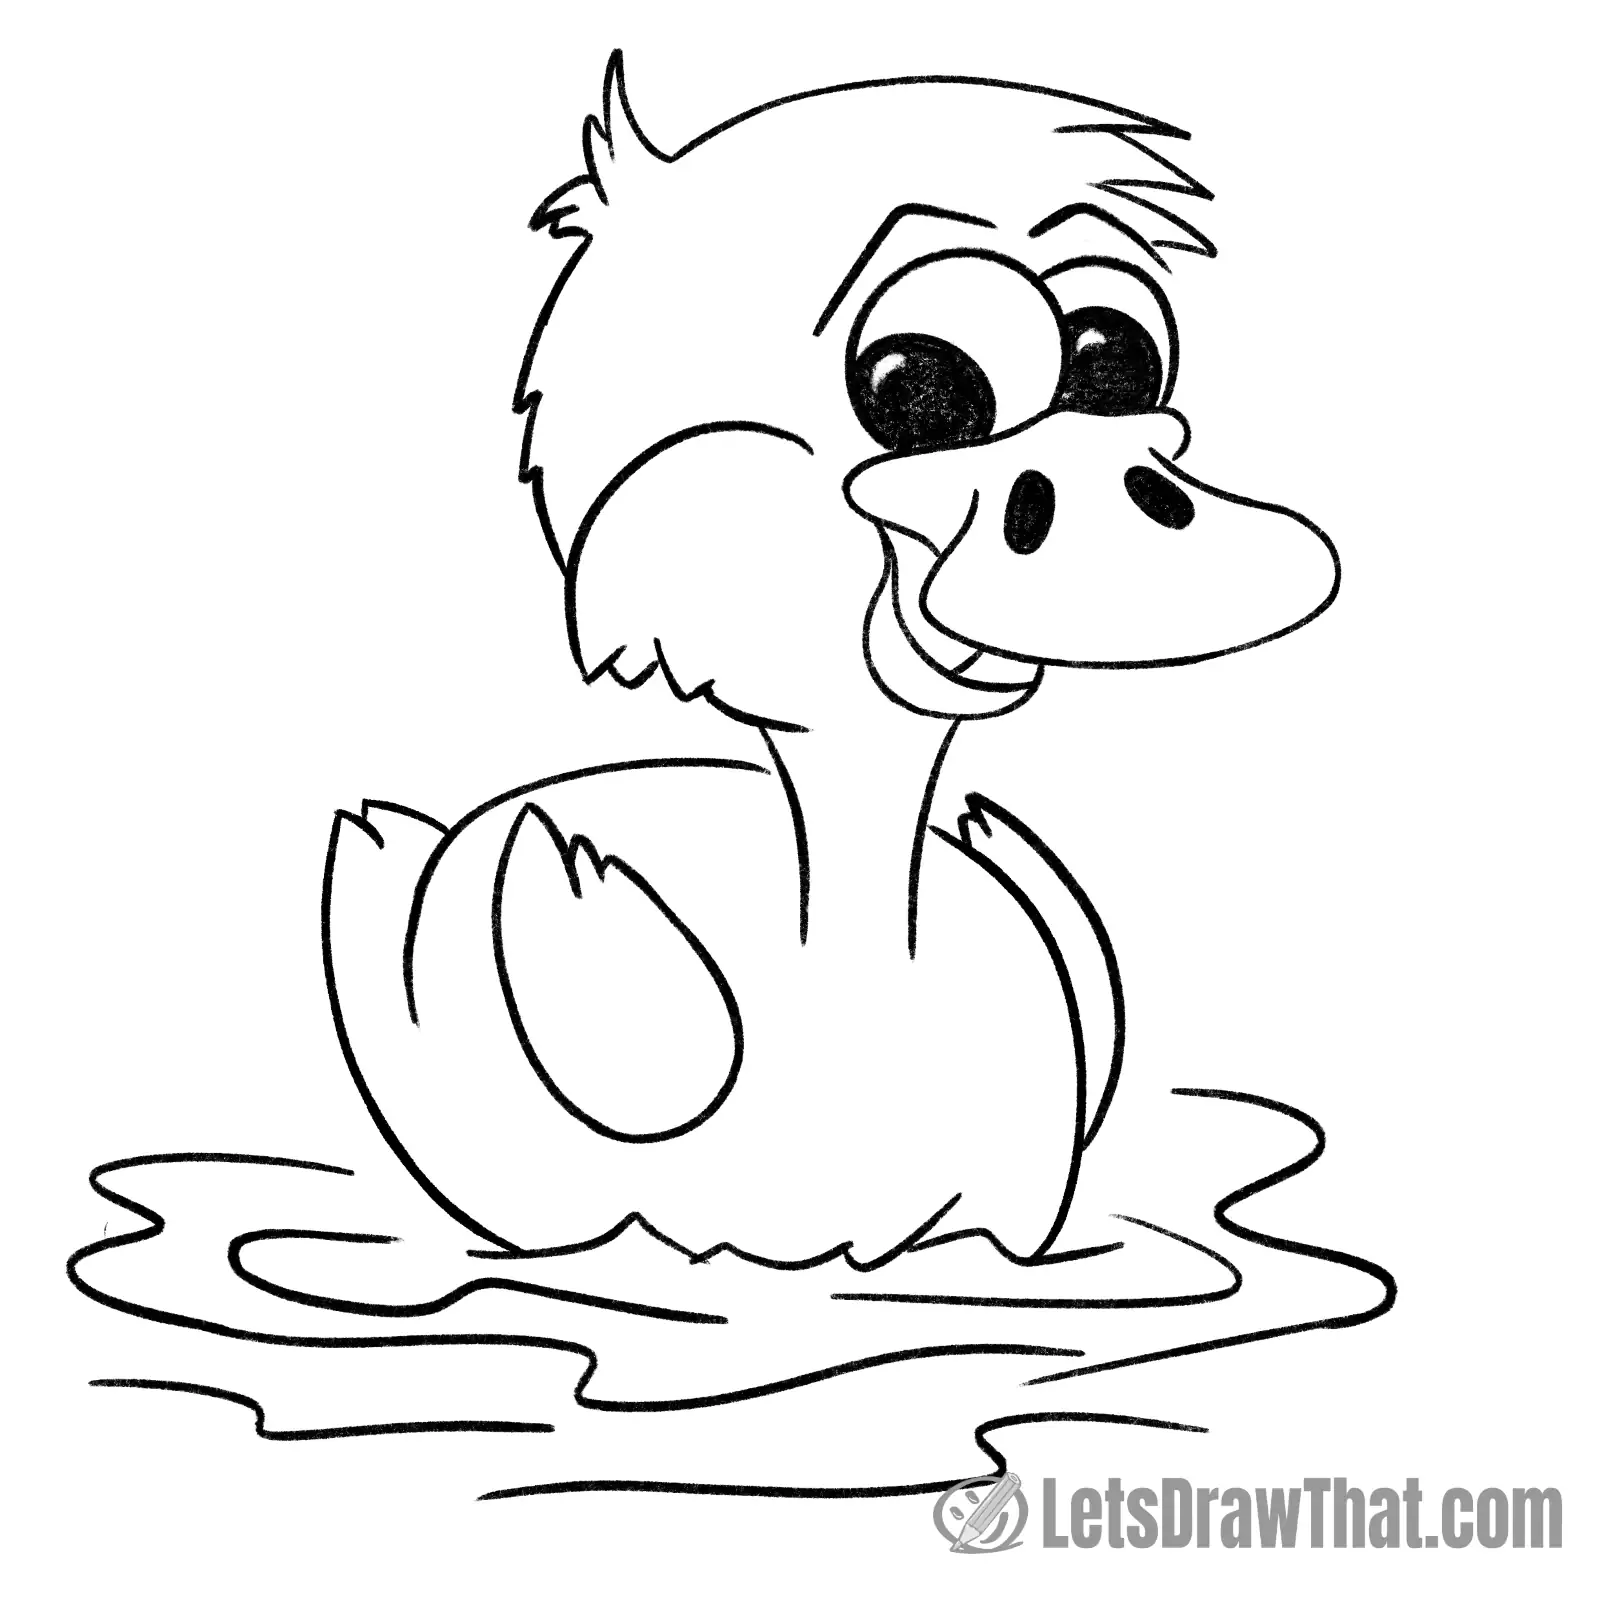
And here is the result of our “how to draw a duckling” tutorial in all its glory after we have erased all sketch lines – a pretty happy, cheerful and cheeky cartoony duckling drawing.
Duckling drawing coloured-in
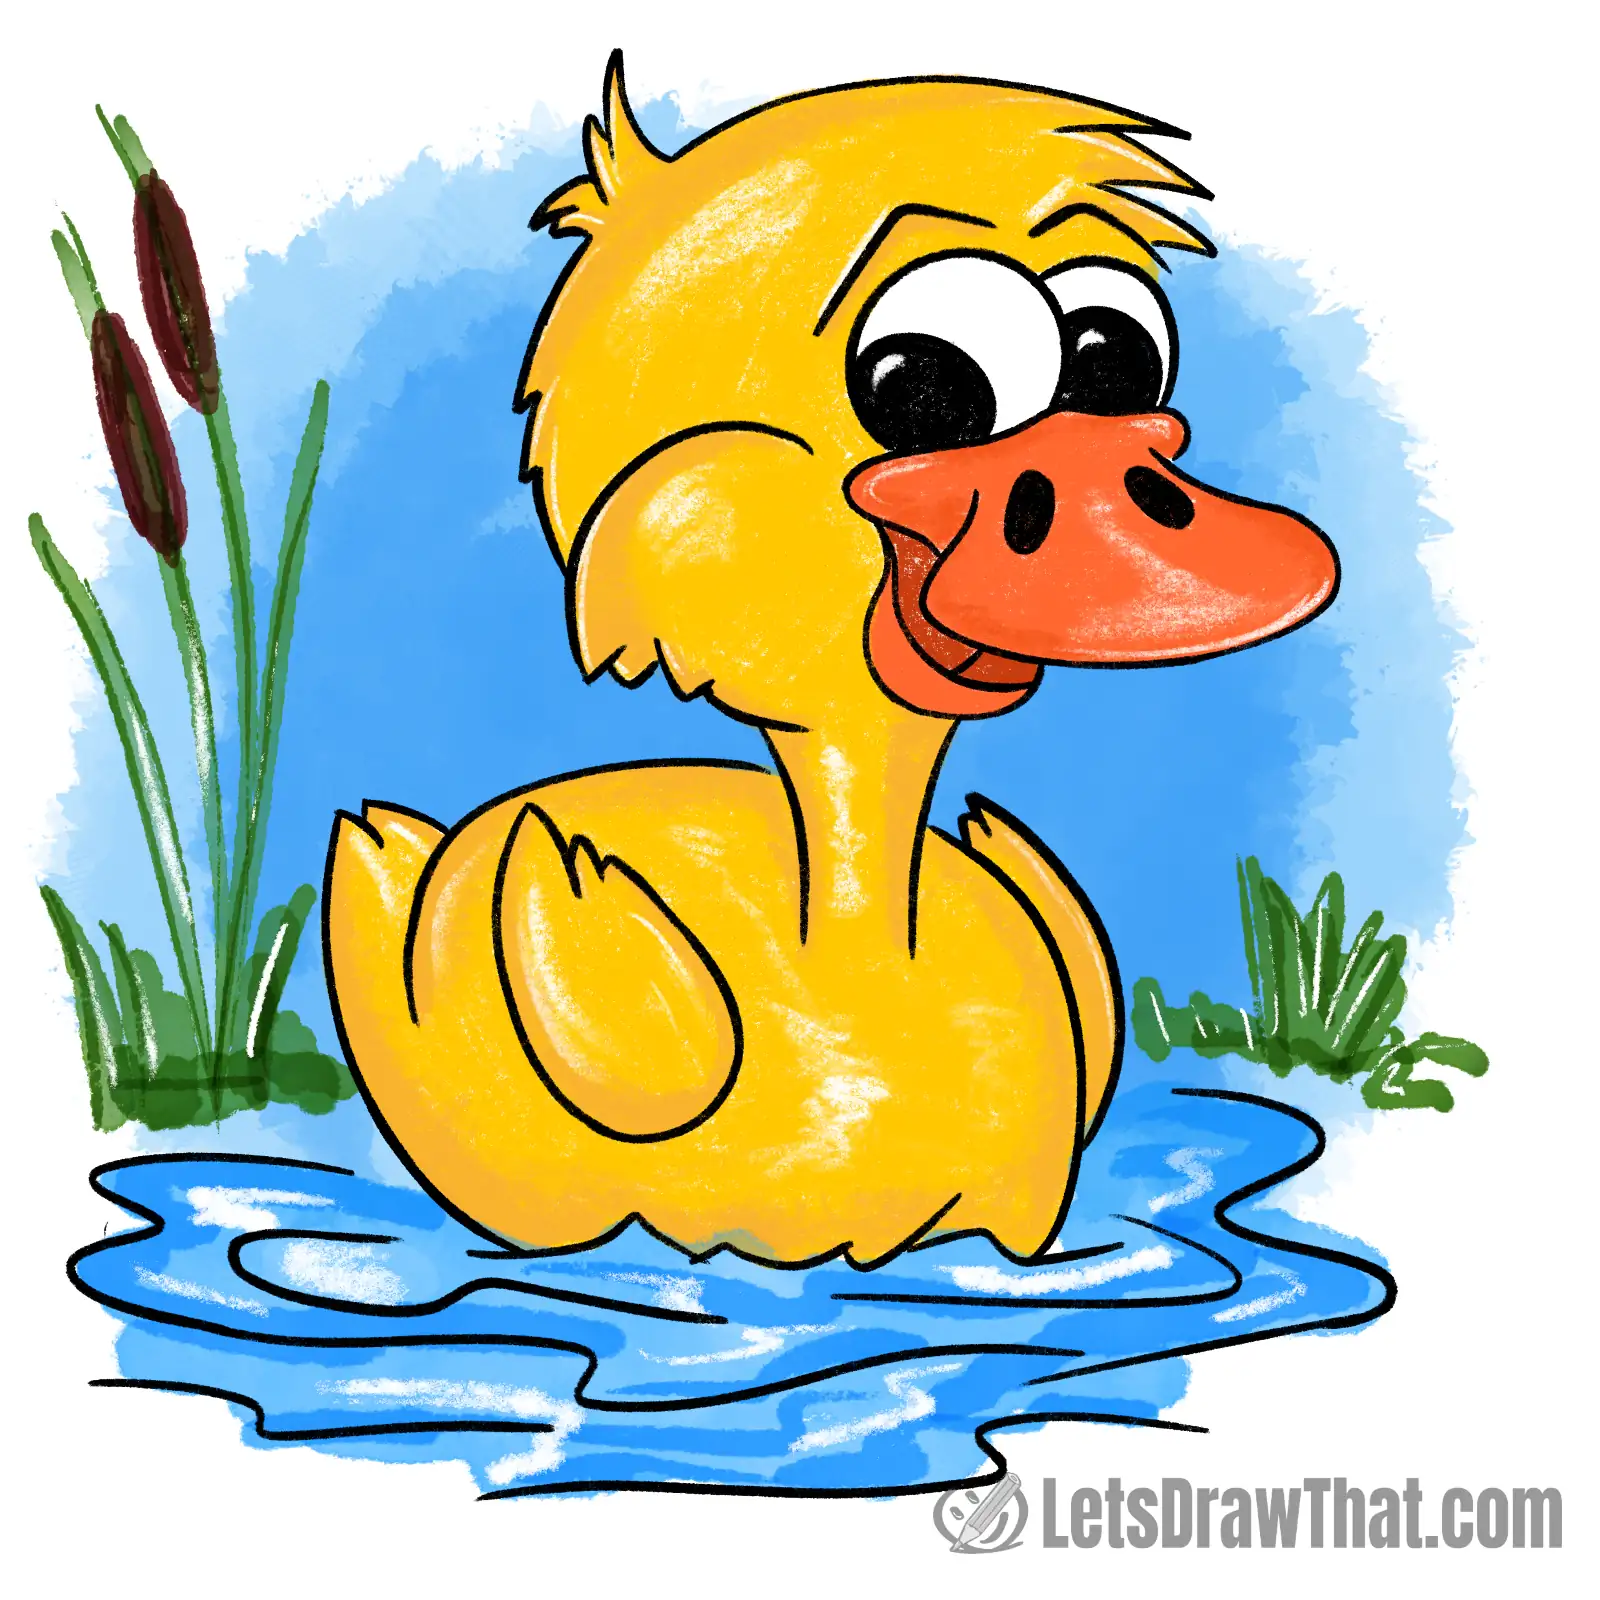
The last step to finish our duckling drawing is to color it in.
The duckling is bright yellow with an orange beak. To give the drawing some volume, we have used some darker yellow and light brown for shading and also left out some white highlights.
The water is nice blue for contrast, again with some white highlights for the waves left out. Oh, and the reeds and grass are sketched in there just for fun.
And that’s it – now you know how to draw a duckling.